Introduction to System Configurations
Configuration Overview
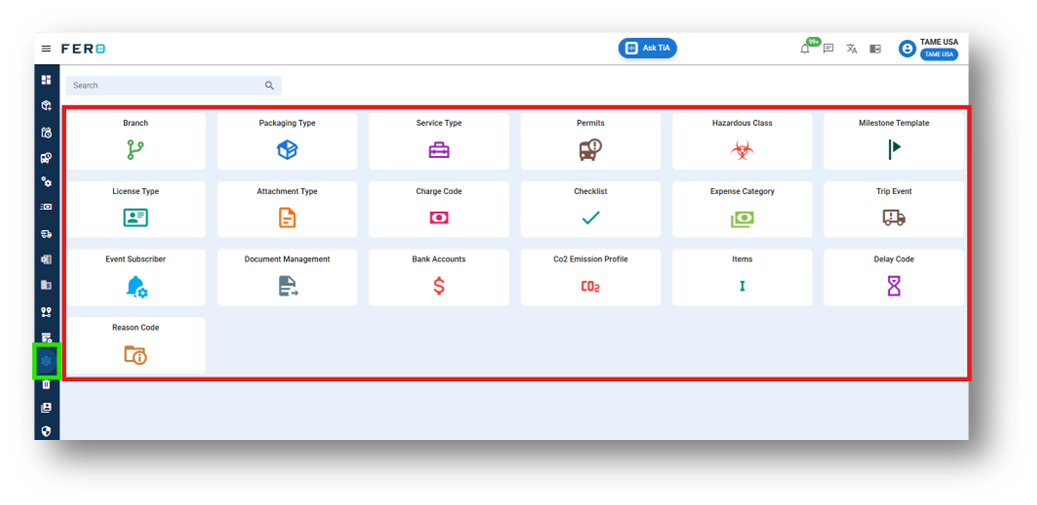
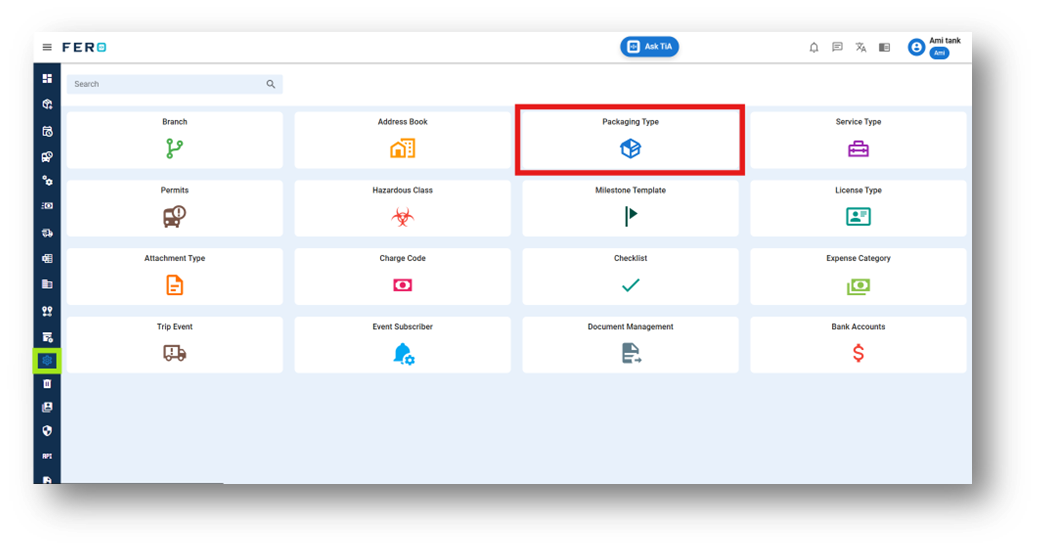
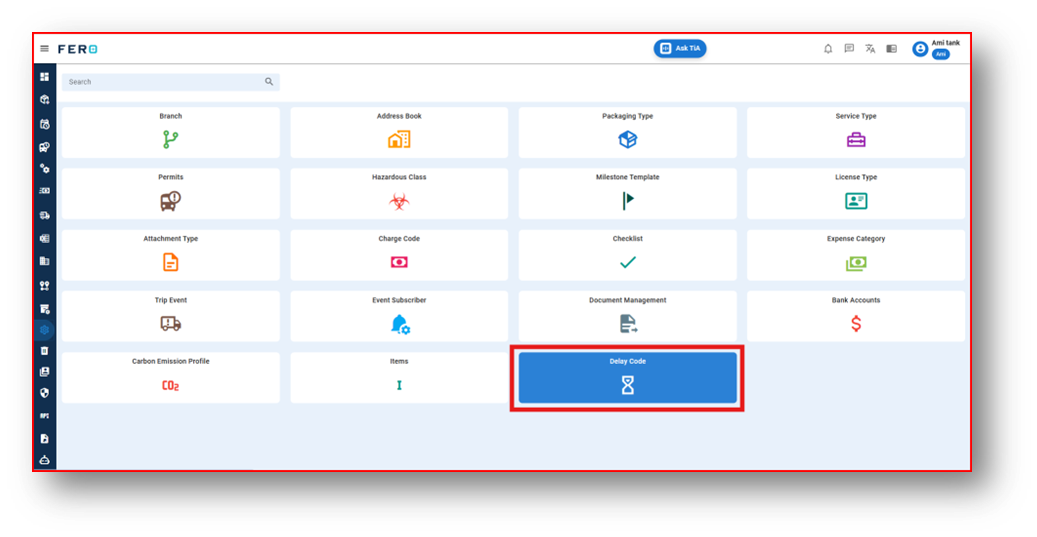
Configuration constitutes the foundational setup that users establish or modify as necessary to ensure seamless operation of a system or software in alignment with their specific requirements. It lays the groundwork for efficient business processes, encompassing the organization of modules and sub-modules such as Branch, Address Book, Packaging Type, Hazardous Class, Milestone Template, License Type, Attachment Type, Charge Code, Checklist, Bank Account, and Event Subscriber. While configuration is typically a one-time task, occasional adjustments or additions may be necessary to accommodate evolving needs.
Configuration Video Tutorial
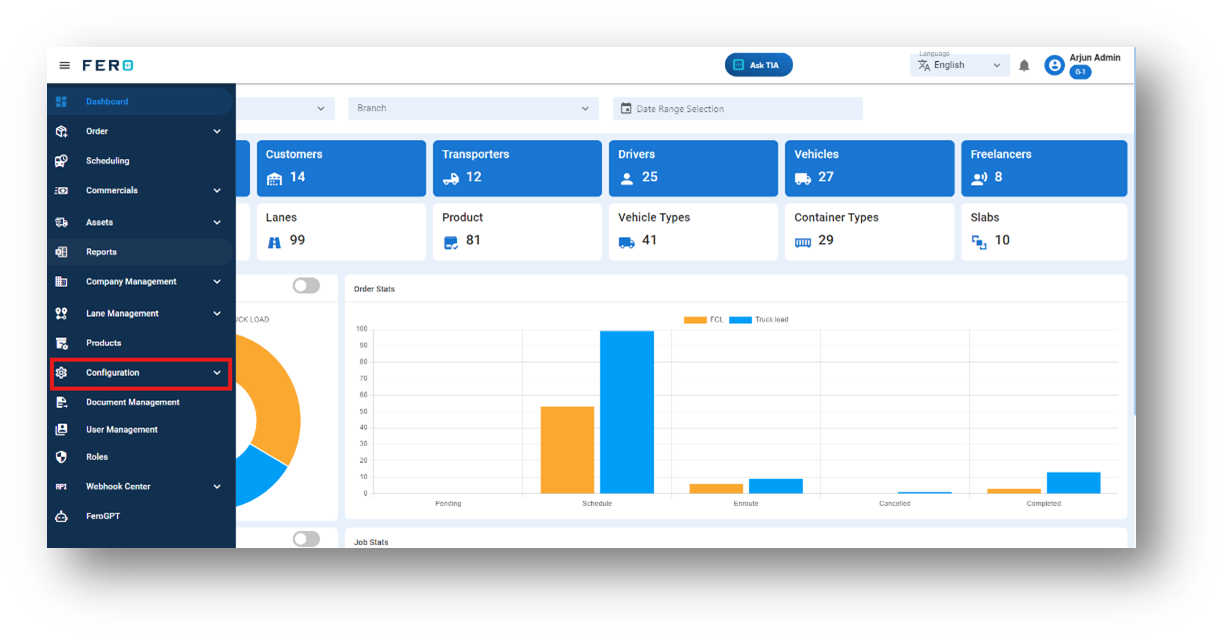
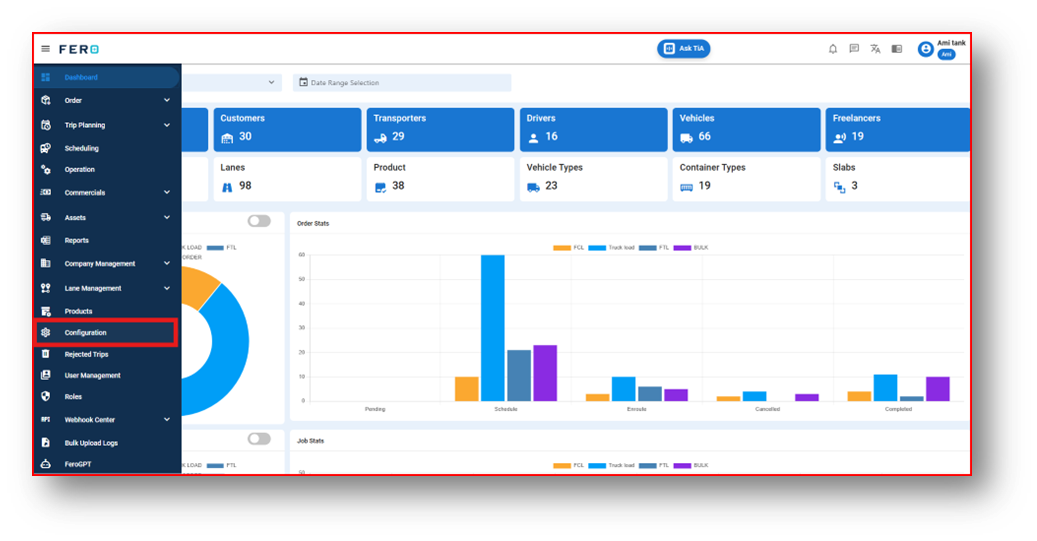
Setting up Configuration's module
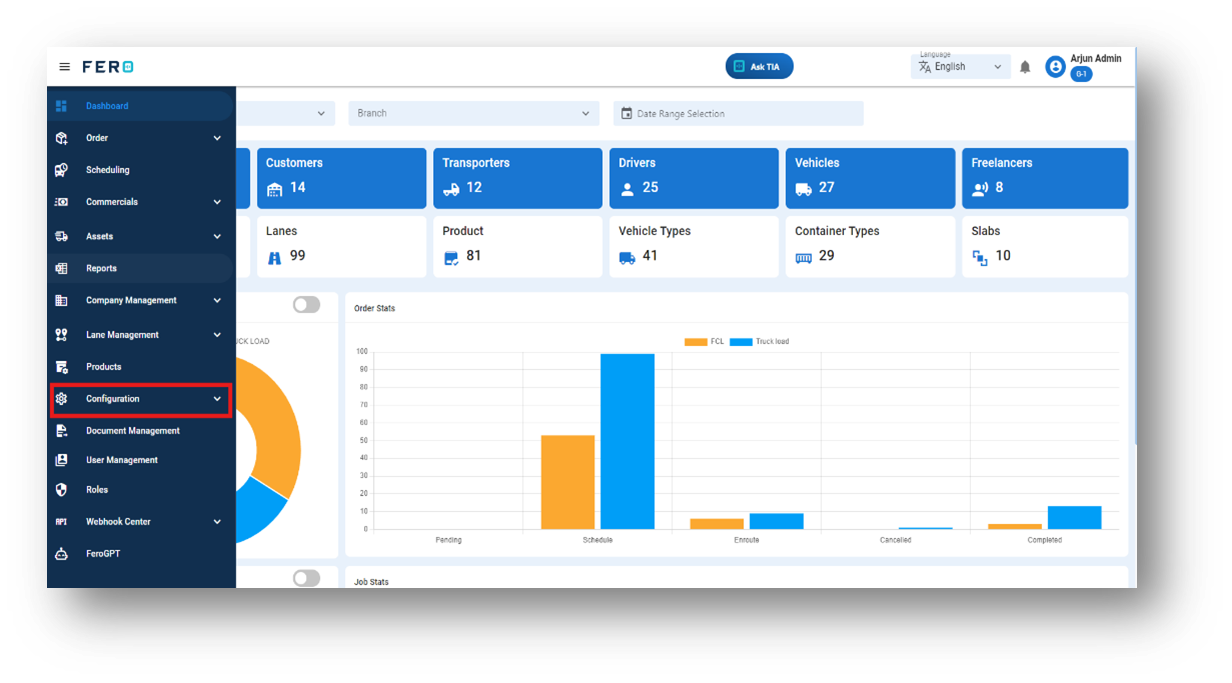
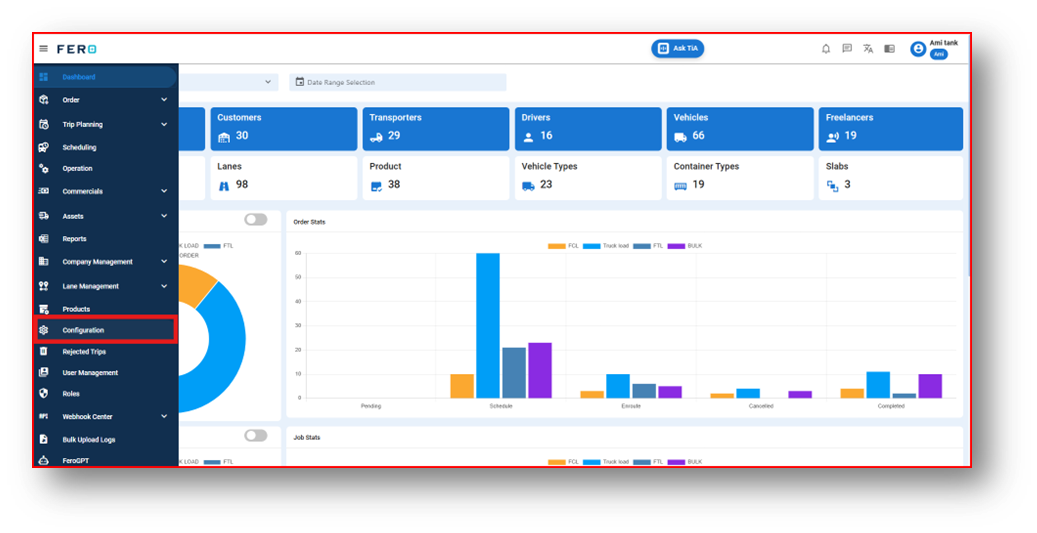
Access the configuration module from the menu bar and select it to reveal a drop-down list of submodules.
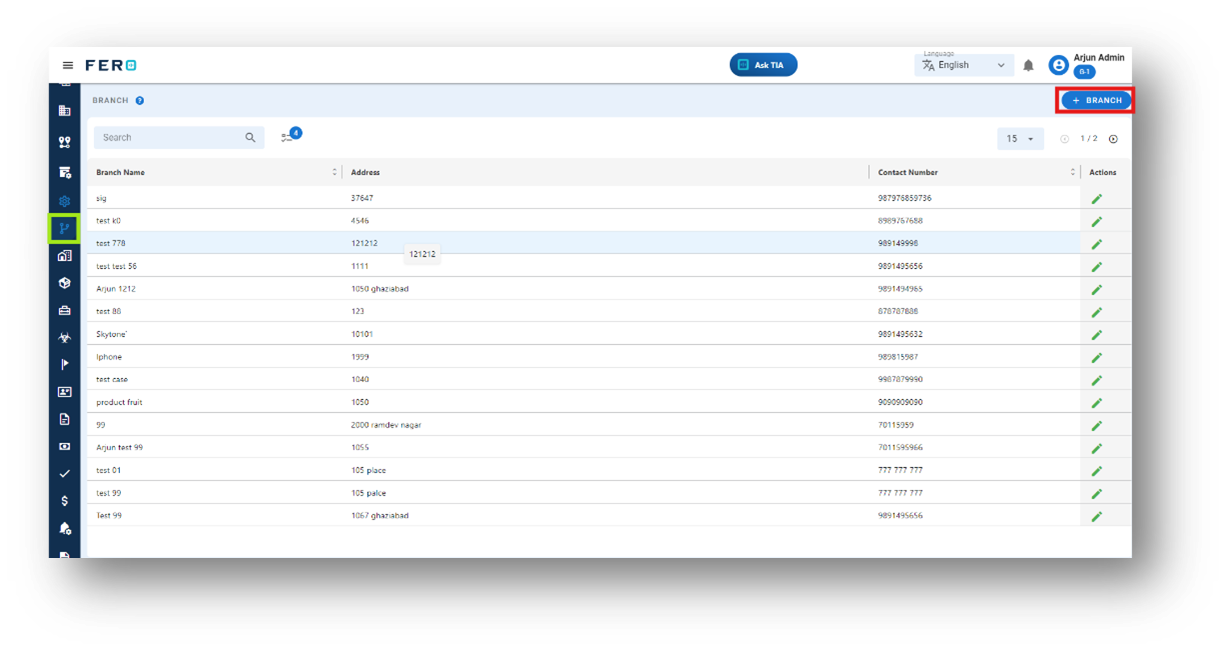
Branch module of configurations
What is a Branch?
A branch serves to optimize business operations by establishing operational offices. Creating branches for various locations enhances management efficiency.
How to set up a branch?
Step 1: Navigate to the configuration section and click on it to reveal the drop-down list.

Step 2: Choose the Branch option from the Configuration homepage.
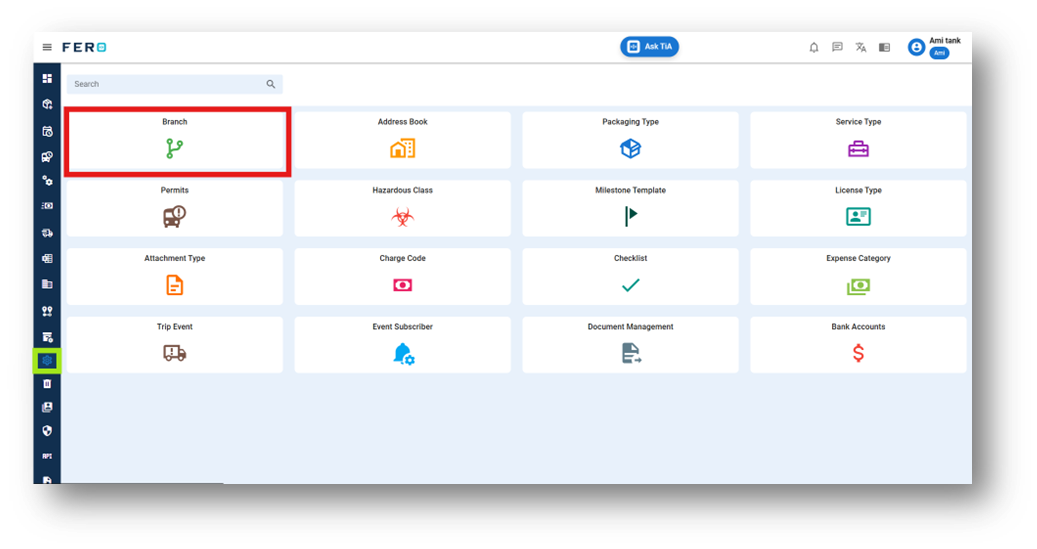
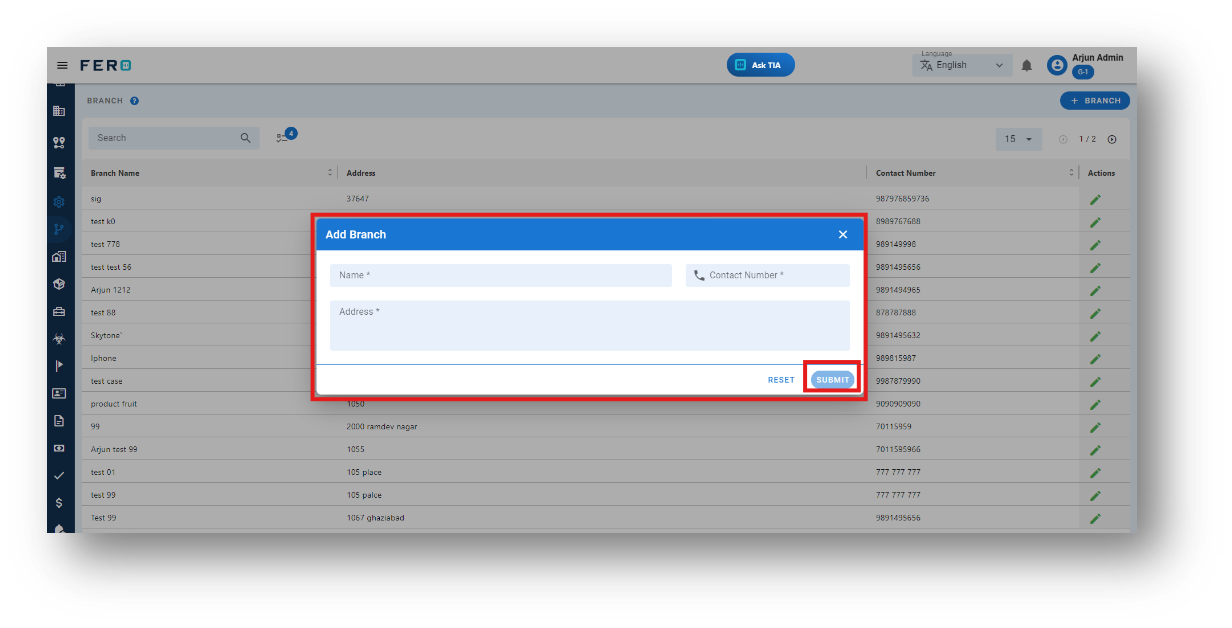
Step 3: Select the "Add Branch" option to initiate the branch creation process.
Step 4: Complete the required fields on the "Add Branch" screen, including Branch Name, Contact Number, and Address Details, then click "Submit" to add the branch.
FAQs
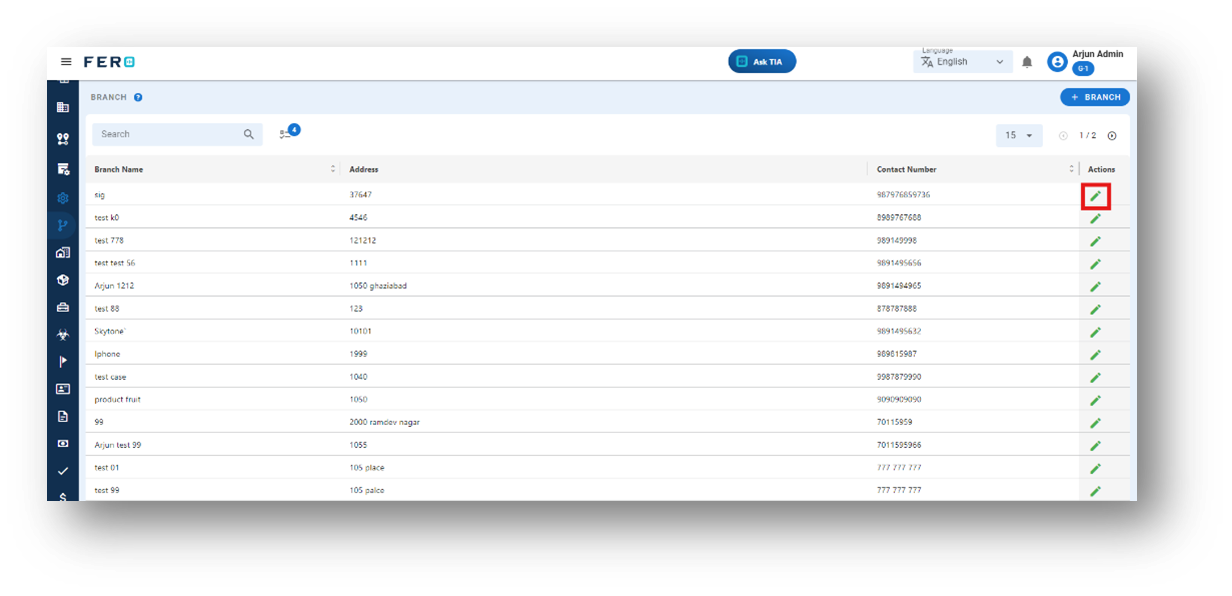
Q1. Can I Edit Branch Details?
Yes, branch details can be edited by navigating to the branch homepage, where all branches are listed. Simply locate the branch requiring modification and click on the edit icon. Changes made will be updated in real-time.
Q2. Can I Add Multiple Branches?
Absolutely. There are no limitations on the number of branches you can add. Depending on your business activities and operational requirements across various locations, multiple branches can be seamlessly incorporated into your organization's structure.
Packaging type module of configuration
What is a Packaging type?
Packaging type refers to the materials used to wrap items for safe and secure transportation, such as cardboard boxes, wooden pallets, or bubble wrap.
How to set up a Packaging type?
Step 1: Navigate to the configuration section and click on it to reveal the drop-down list.

Step 2: Choose the Packaging type option from the Configuration homepage.
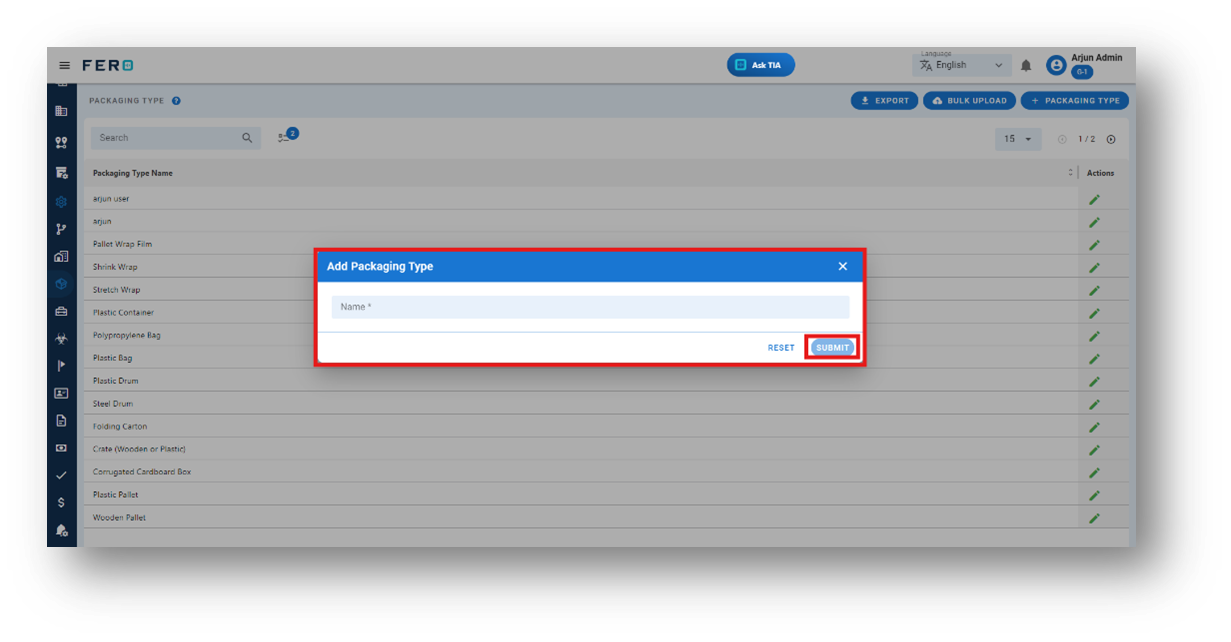
Step 3: Select the "Add Packaging type" option to initiate the packaging type creation process.
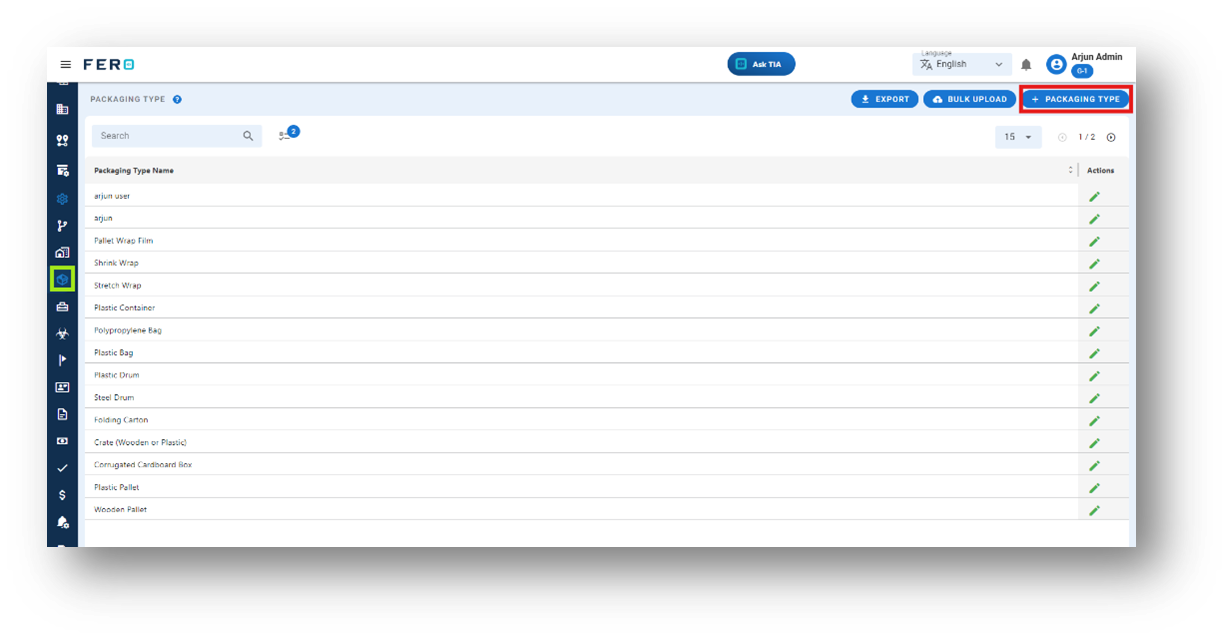
Step 4: Fill out the package type name and click the submit button. Your package type will be included in the packaging module.
FAQs
Q1. Can I Bulk Upload the Packaging Type?
Yes, you can bulk upload packaging types. This method is the easiest and fastest way to add various packaging types. To do this, navigate to the bulk upload option, download the sample file, enter the details into the sample file, and upload the document. All the packaging types will be added within seconds.
Q2. Can I Edit Packaging Type?
Yes, packaging type details can be edited by navigating to the Packaging Type homepage, where all packaging types are listed. Locate the packaging type you wish to modify and click on the edit icon. Changes will be updated in real-time.
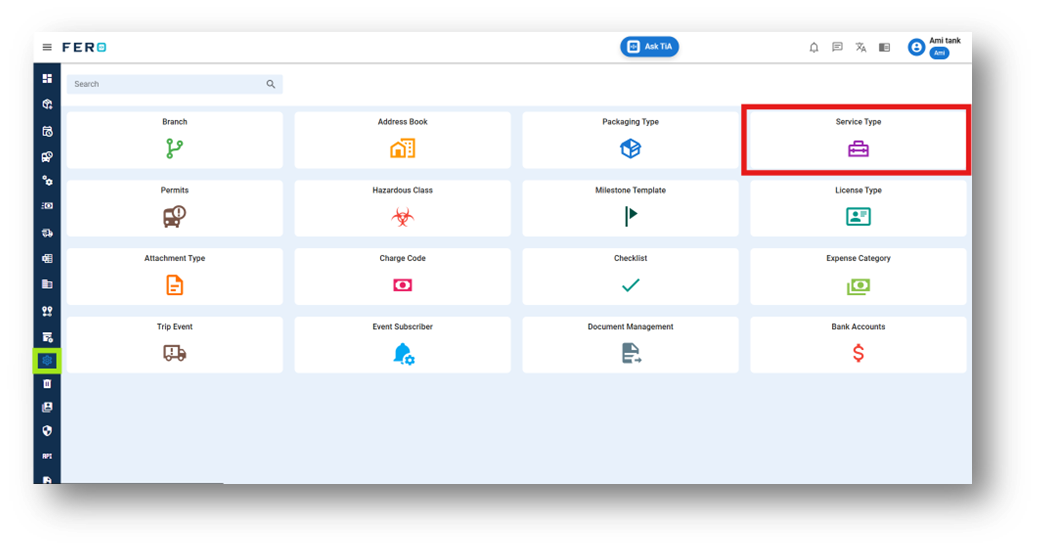
Service type module of configuration
What is a Service type?
Service type defines the level of service offered, including options like express delivery, same-day delivery, and more.
How to set up a Service type
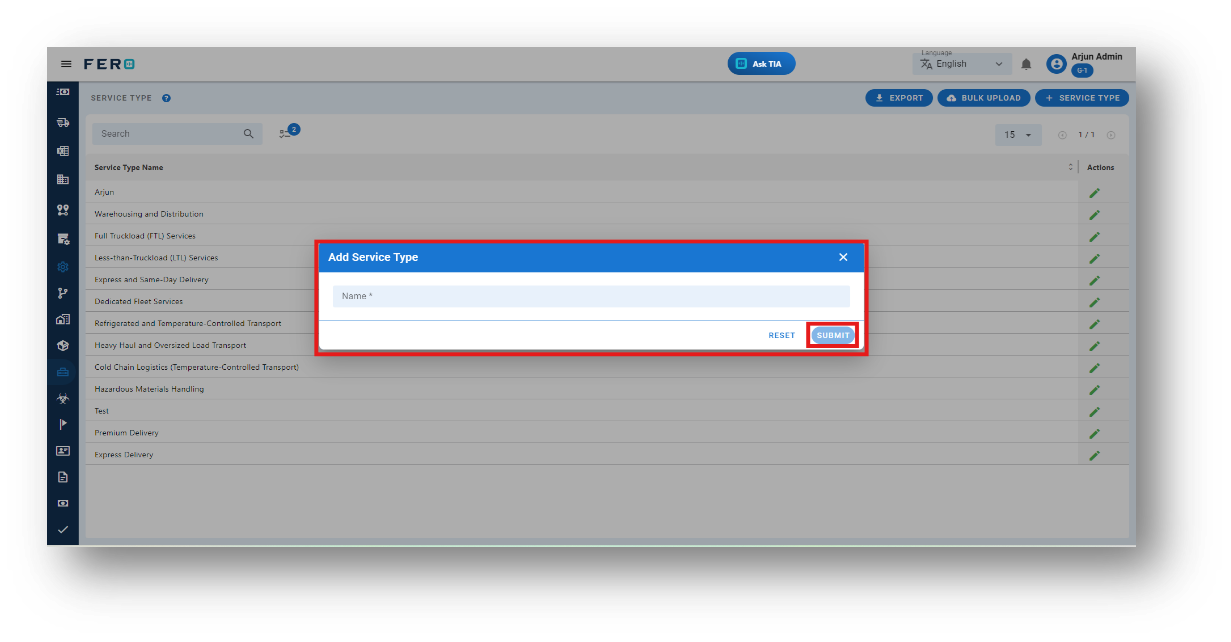
Step 1: Navigate to the configuration section and click on it to reveal the drop-down list.

Step 2: Choose the Service type option from the drop-down list to access the Service Type homepage.
Step 3: Select the "Add Service type" option to initiate the Service type creation process.
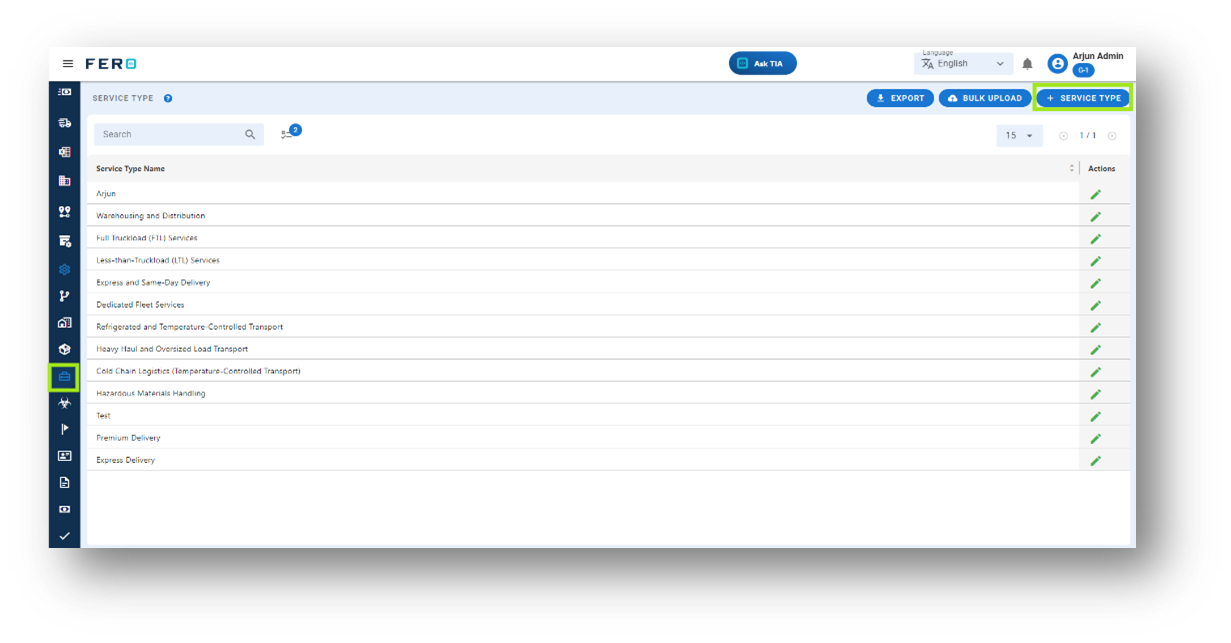
Step 4: Fill out the Service type name and click the submit button. Your Service type will be included in the Service module.
FAQs
Q1. Can I Bulk Upload the Service Type?
Yes, you can bulk upload Service types. This method is the easiest and fastest way to add various Service types. To do this, navigate to the bulk upload option, download the sample file, enter the details into the sample file, and upload the document. All the packaging types will be added within seconds.
Q2. Can I Edit Service Type?
Yes, Service type details can be edited by navigating to the Service Type homepage, where all packaging types are listed. Locate the Service type you wish to modify and click on the edit icon. Changes will be updated in real-time.
Hazardous class module of configuration
What is a Hazardous class?
Hazards class categorizes transportation items based on their potential risk during transit, such as biochemicals or flammable materials.
How to set up a Hazards class?
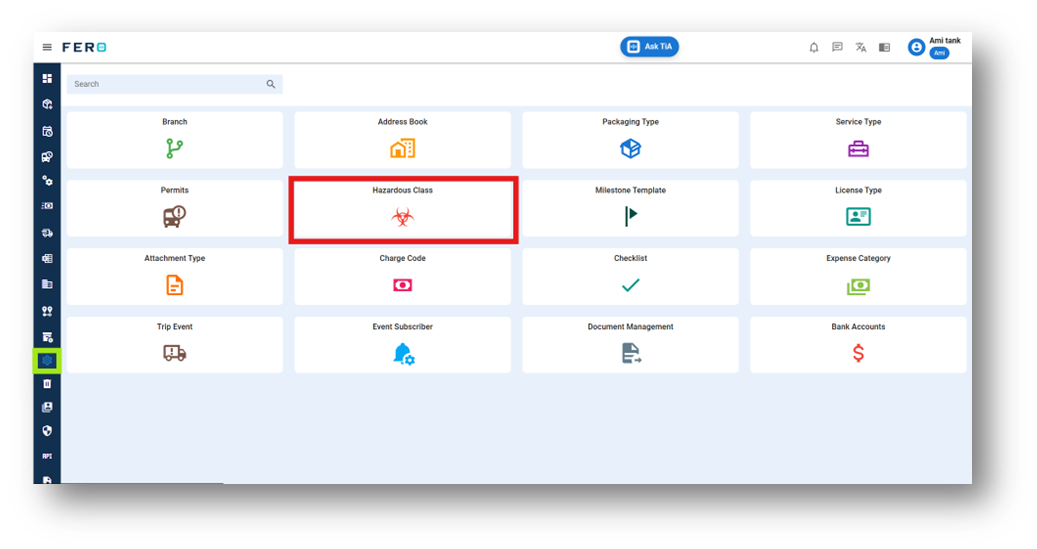
Step 1: Navigate to the configuration section and click on it to reveal the drop-down list.

Step 2: Choose the Hazards class option from the Configuration homepage.
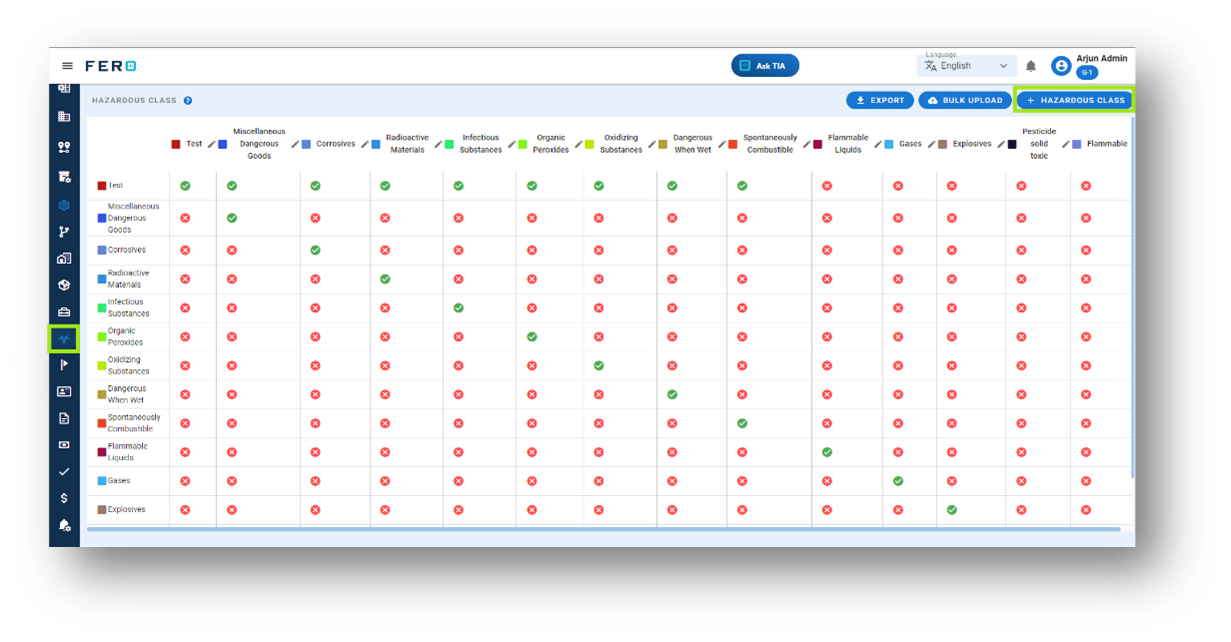
Step 3: Select the "Add Hazards class " option to initiate the Hazards class creation process.
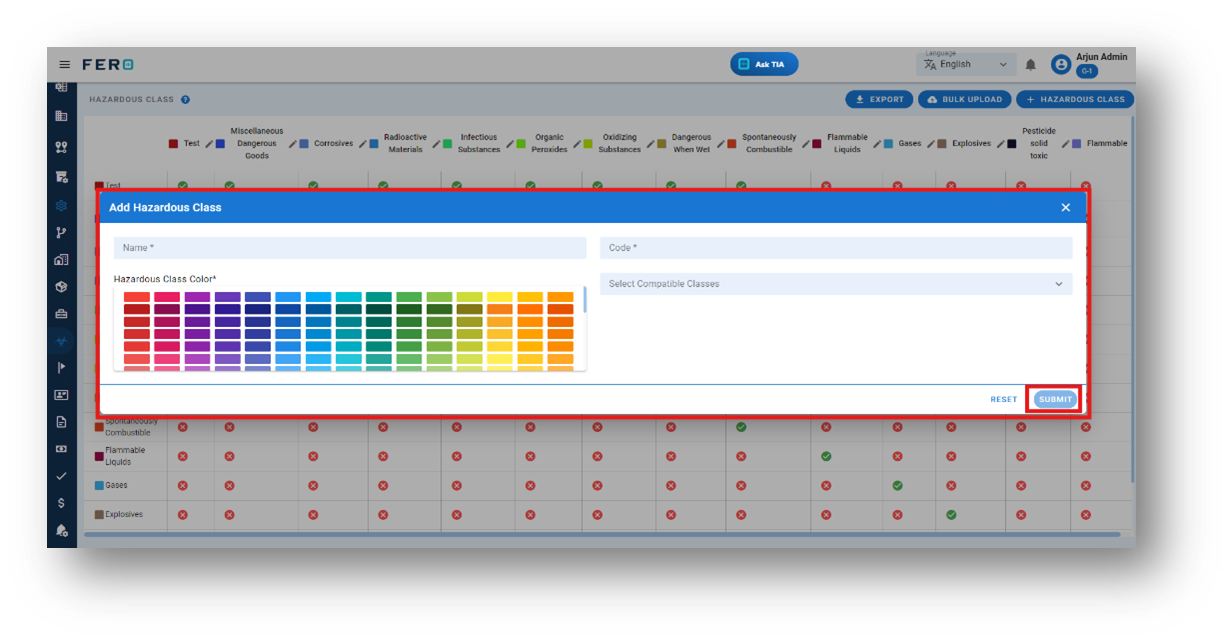
Step 4: Fill out the required fields:
- Hazardous Class Name
- Hazardous Class Code
- Select Compatible Classes from the dropdown fields
- Assign a Color Code by clicking on the color field
After completing these fields, click the "Submit" button. Your hazardous class will be added successfully
FAQs
Q1. Can I Bulk Upload the Hazardous Class?
Yes, you can bulk upload Hazardous Class. This method is the easiest and fastest way to add various Hazardous Class. To do this, navigate to the bulk upload option, download the sample file, enter the details into the sample file, and upload the document. All the Hazardous Class will be added within seconds.
Q2. Can I Edit Hazardous Class?
Yes, Hazardous Class details can be edited by navigating to the Hazardous Class homepage, where Hazardous Class are listed. Locate the Hazardous Class you wish to modify and click on the edit icon. Changes will be updated in real-time.
Milestone Templates module of configuration
What are Milestone Templates?
A milestone template outlines key points or achievements to be reached during transportation, ensuring progress tracking and timely execution.
How to set up a Milestone template?
Step 1: Navigate to the configuration section and click on it to reveal the drop-down list.

Step 2: Choose the Milestone template option from the Configuration homepage.
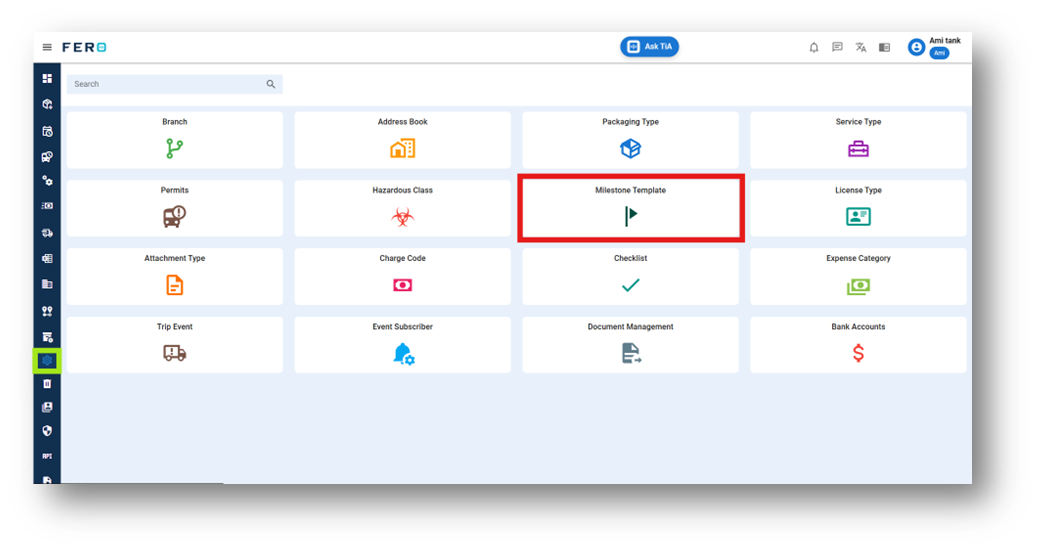
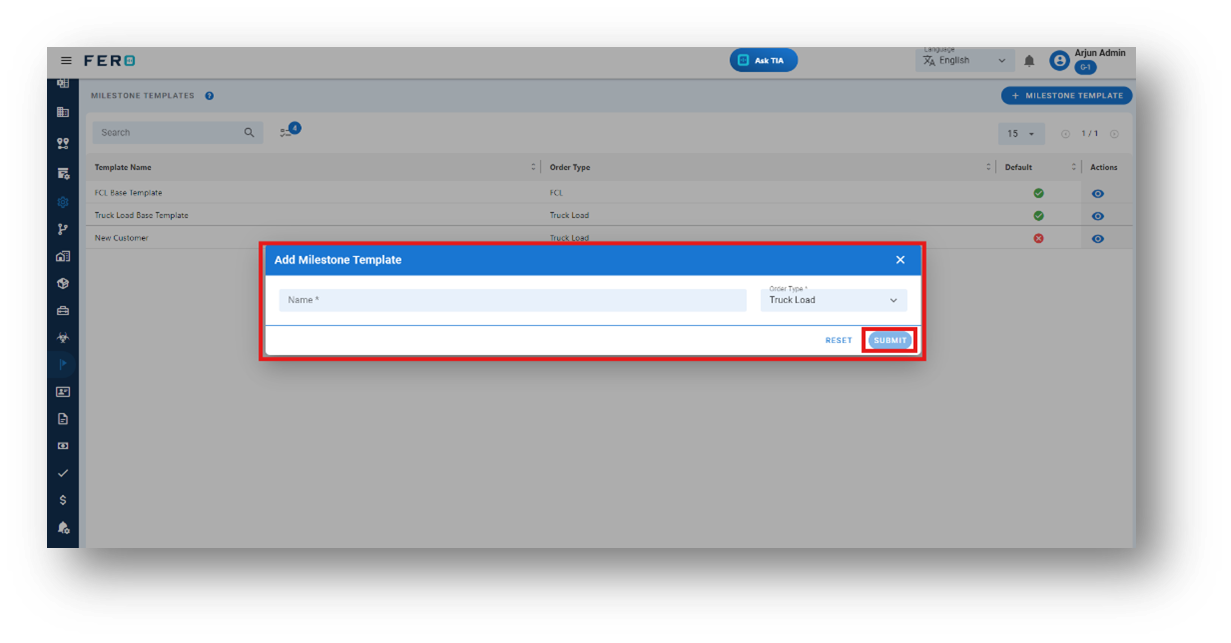
Step 3: Select the " Milestone template " option to initiate the Milestone template creation process.
Step 4: Fill out the required fields:
- Milestone template Name
- Select Milestone order type Truck load or Container load from the drop-down option then click submit
After completing these fields, click the "Submit" button. Your Milestone template will be added successfully.
How to Edit Existing or Newly Created Milestone Templates?
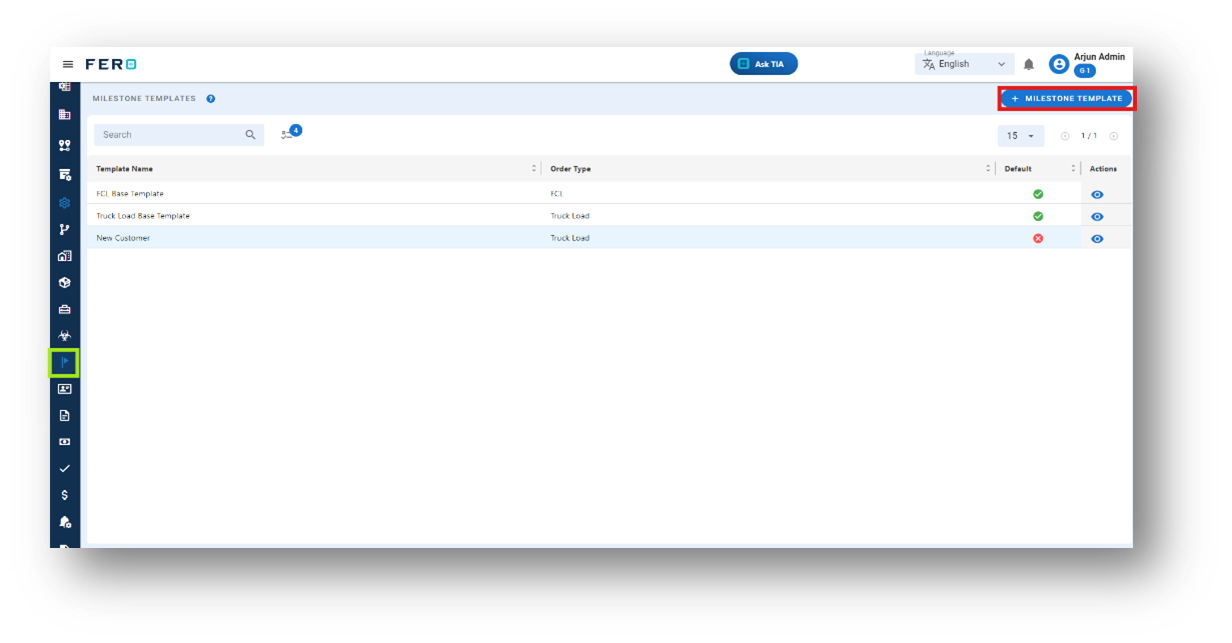
The system comes with two predefined milestone templates: one for truck loads and another for container loads.
Steps to Edit a Milestone Template:
Step 1: Open the Milestone Template module. You will see a list of all milestone templates.
Step 2: Select the milestone template you wish to edit by clicking on the eye icon.
Step 3: Navigate to the "Add Milestone" option and click on it.
Step 4: A pop-up screen will appear. Define the name of the milestone, use the toggle button to activate or deactivate it, and specify if any attachments need to be captured. Then, click "Submit."
Step 5: The new milestone will be added and displayed. You can easily drag and drop the milestone into the existing sequence based on your operational work
This process allows for seamless customization and adaptation of milestone templates to fit your business needs.
Need to Add Video available to upload
License type module of configuration
What is a License Type?
License type specifies the classification of a driver's license, indicating the vehicles they are authorized to operate legally.
How to set up a License type?
Step 1: Navigate to the configuration section and click on it to reveal the drop-down list.

Step 2: Choose the License type option from the Configuration homepage.
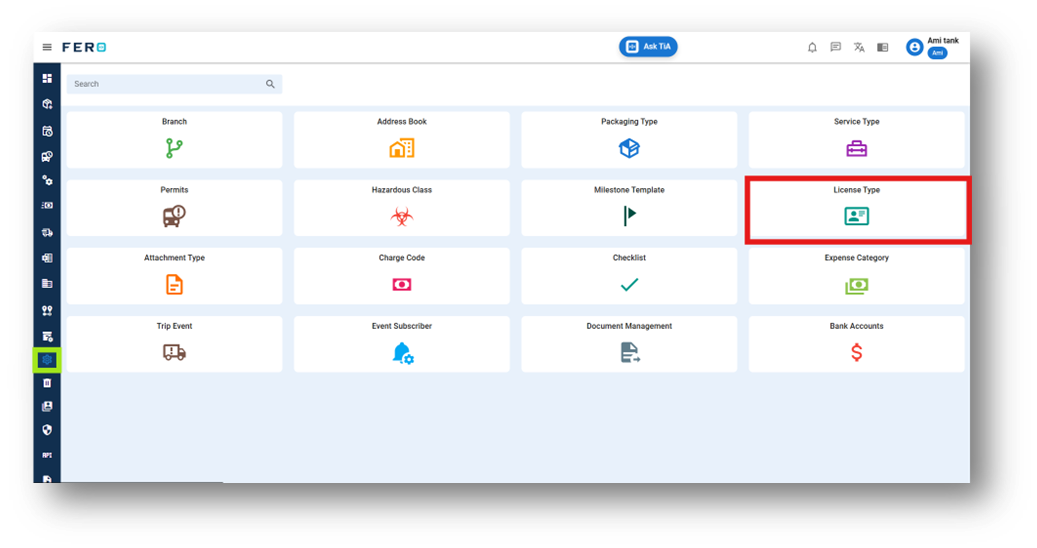
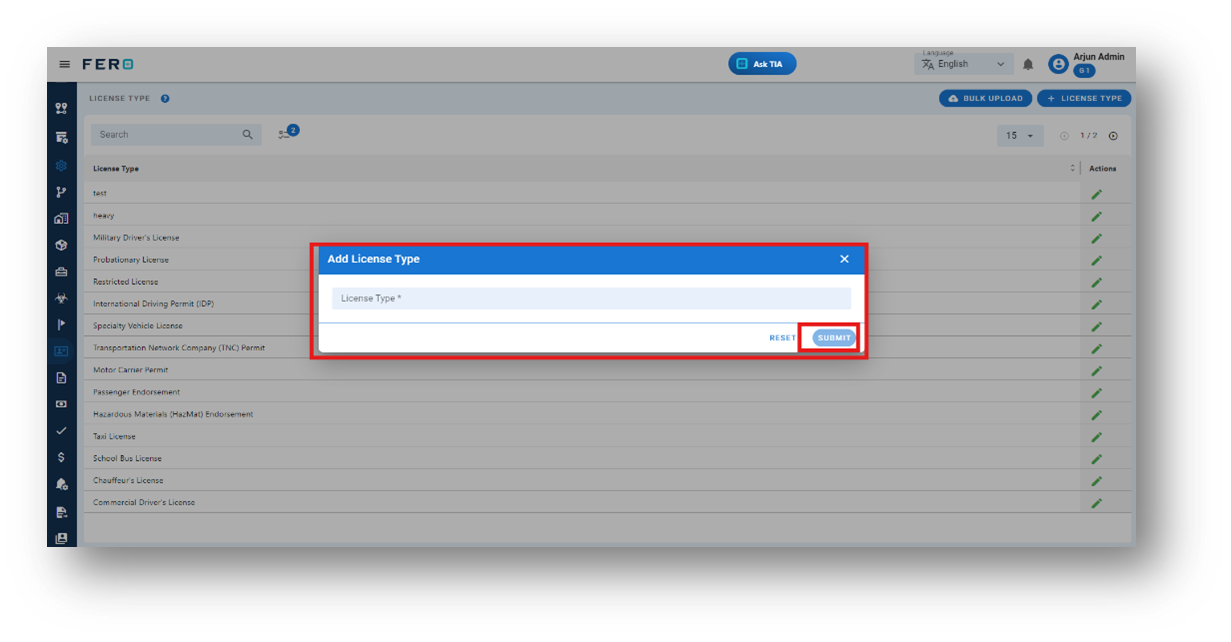
Step 3: Select the "Add License type " option to initiate the License type creation process.
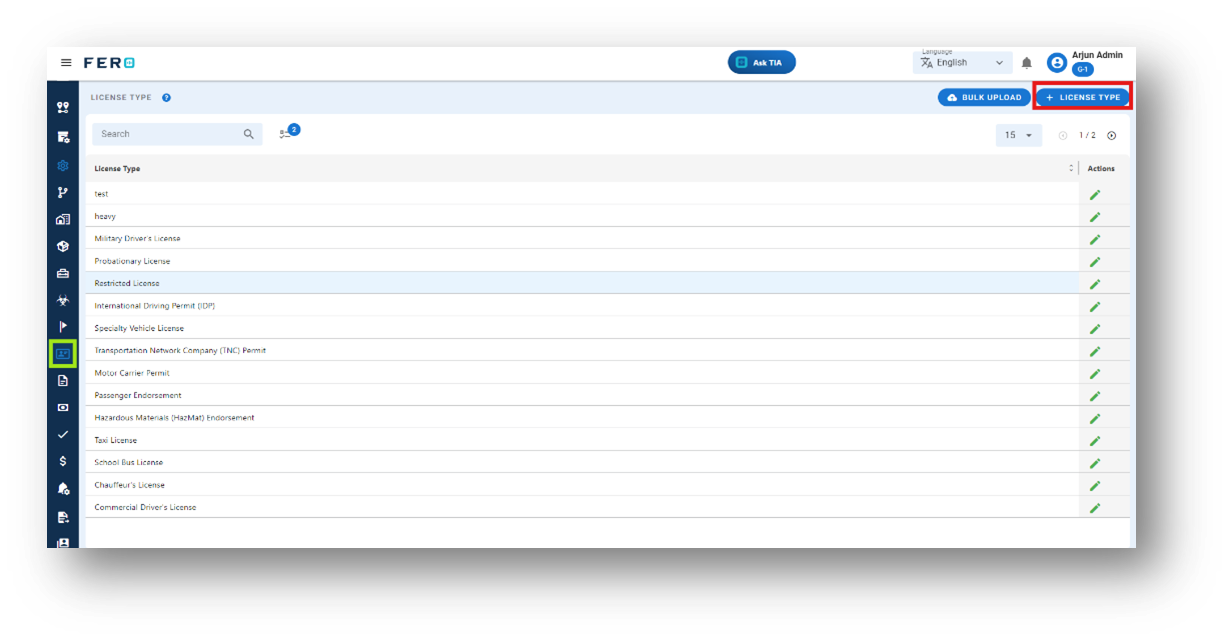
Step 4: Fill out the License type name and click the submit button. Your License type will be included in the License type module.
FAQs
Q1. Can I Bulk Upload the License type?
Yes, you can bulk upload License type. This method is the easiest and fastest way to add various License types. To do this, navigate to the bulk upload option, download the sample file, enter the details into the sample file, and upload the document. All the License types will be added within seconds.
Q2. Can I Edit License type?
Yes, License type details can be edited by navigating to the License type homepage, where all License type are listed. Locate the License type you wish to modify and click on the edit icon. Changes will be updated in real-time.
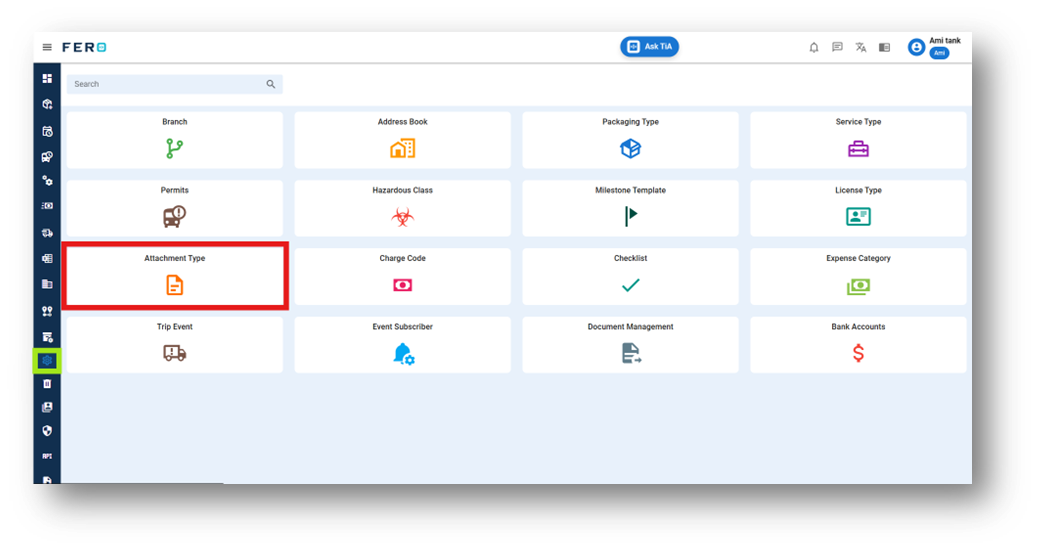
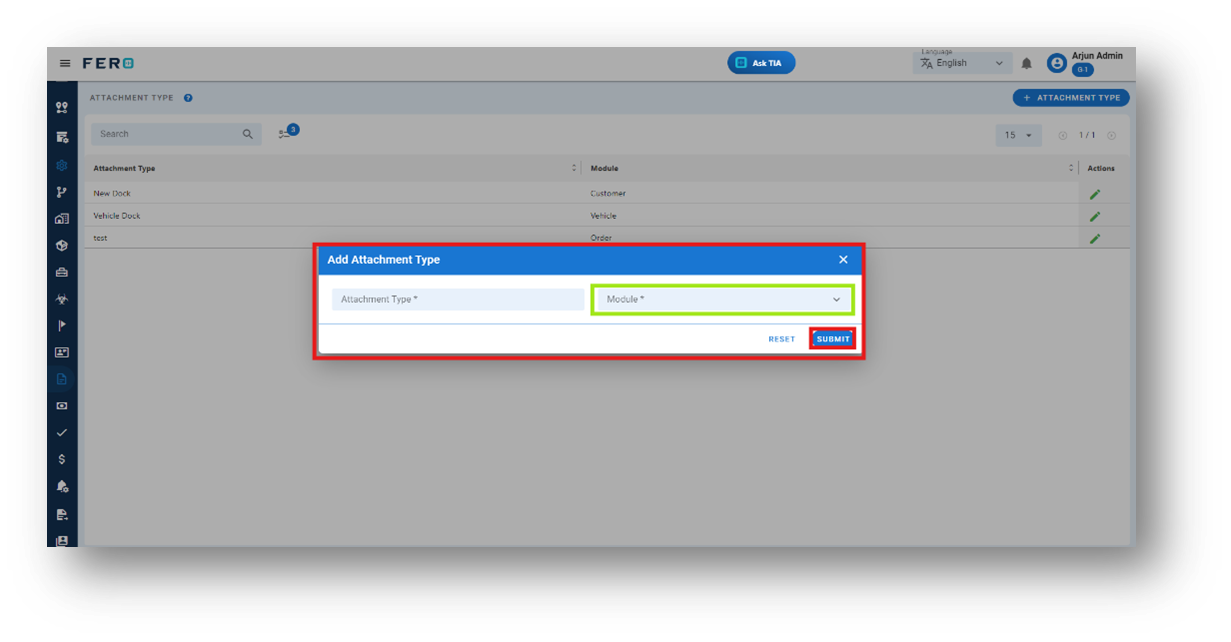
Attachment type module of configuration
What is an Attachment Type?
Attachment types are various documents that can be linked for organizational, customer, or vehicle-related purposes.
How to set up an Attachment types?
Step 1: Navigate to the configuration section and click on it to reveal the drop-down list.

Step 2: Choose the Attachment types option from the Configuration homepage.
Step 3: Select the "Add Attachment types " option to initiate the Attachment types of creation process.
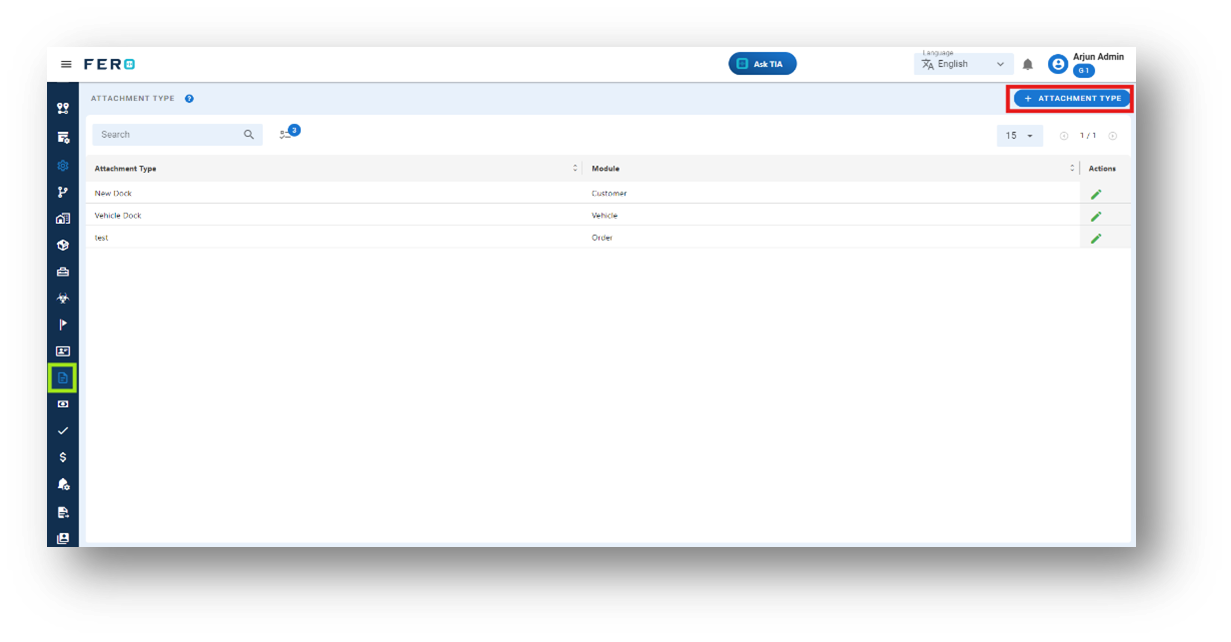
Step 4: Complete the following fields:
- Attachment Type Name
- Select Module Type from the dropdown list
After filling out these fields, click the "Submit" button. Your attachment type will be added to the Attachment Types module.
FAQs
Q1. Can I Edit Attachment Types?
Yes, Attachment Types details can be edited by navigating to the Attachment Types homepage, where all Attachment Types are listed. Locate the Attachment Types you wish to modify and click on the edit icon. Changes will be updated in real-time.
Q2. Can I Add Multiple Attachment Types of modules?
Absolutely, there are no limitations on the number of Attachment Types you can add for a module. Depending on your business activities and operational requirements, multiple Attachment Types can be seamlessly incorporated into your organization's structure.
Charge code module of configuration
What is a charge code?
Charge codes indicate additional or deducted fees related to shipments, facilitating the tracking and categorization of financial aspects.
How to set up a Charge code?
Step 1: Navigate to the configuration section and click on it to reveal the drop-down list.

Step 2: Choose the Charge code of option from the Configuration homepage.
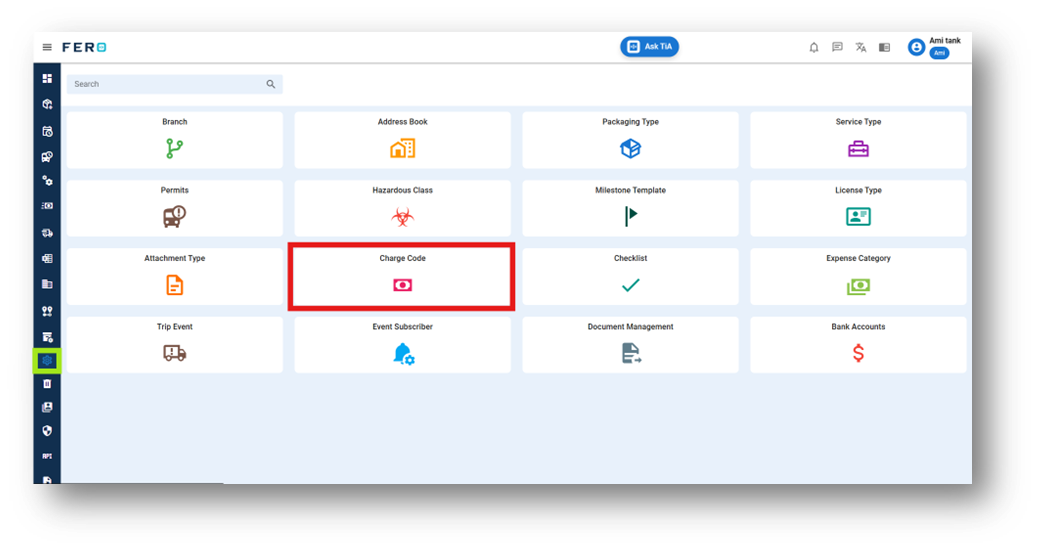
Step 3: Select the "Add Charge codes " option to initiate the Charge codes creation process.
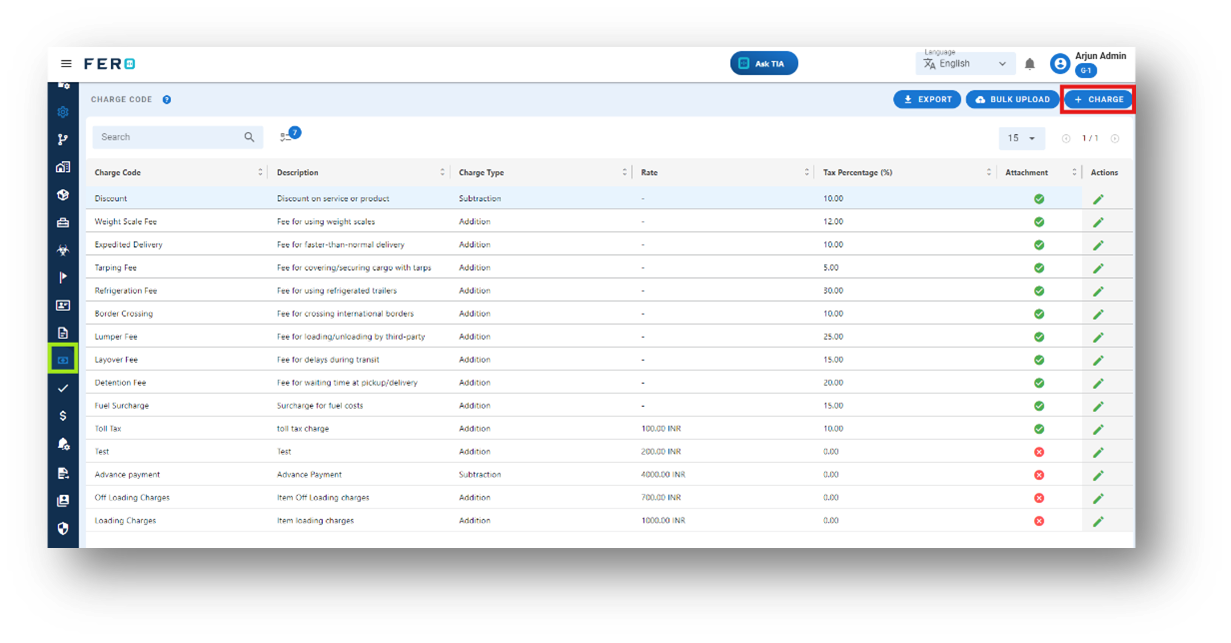
Step 4: Complete the following fields:
- Name the Code Type
- Description of Code
- Select Charge Type (Addition or Subtraction) from the dropdown option
- Define the Rate Amount and Tax Percentage (optional field)
- Use the Toggle Button if any attachment needs to be captured for a specific charge code (optional field)
After filling out these fields, click the "Submit" button. Your charge code will be added to the Charge Code module

FAQs
Q1. Can I Edit the Charge Code?
Yes, Charge Code details can be edited by navigating to the Charge Code homepage, where all Charge Code are listed. Locate the Attachment Types you wish to modify and click on the edit icon. Changes will be updated in real-time.
Q2. Can I Add Multiple Charge Code?
Absolutely, there are no limitations on the number of Charge Code you can add for a module. Depending on your business activities and operational requirements, multiple Charge Code can be seamlessly incorporated into your organization's structure.
Q3. Can I Bulk Upload the Charge Code?
Yes, you can bulk upload Charge Code. This method is the easiest and fastest way to add various Charge Code. To do this, navigate to the bulk upload option, download the sample file, enter the details into the sample file, and upload the document. All the Charge Code will be added within seconds.
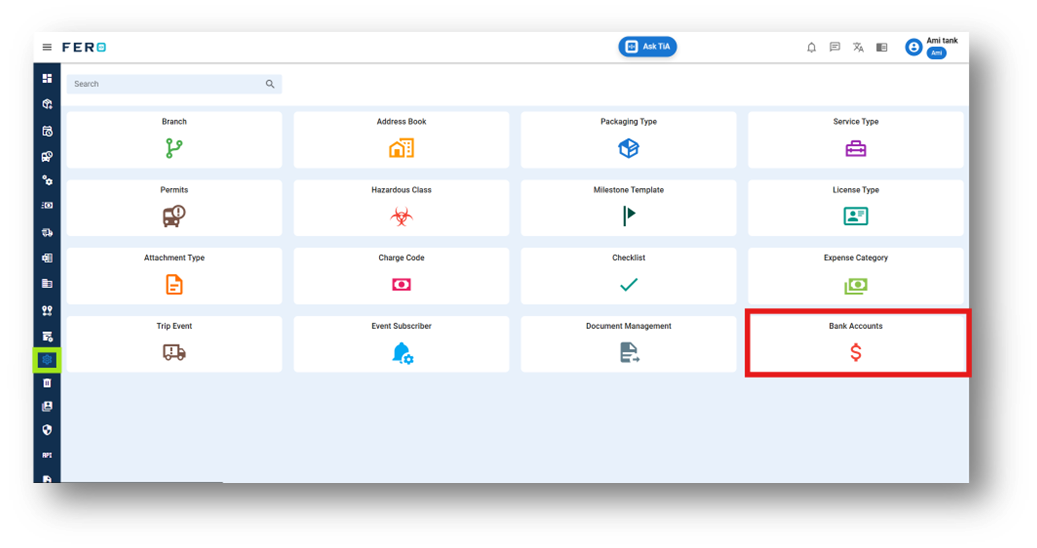
Bank Account module of configuration
What is a Bank Account?
Bank account details where business payments are received can be added for streamlined financial management.
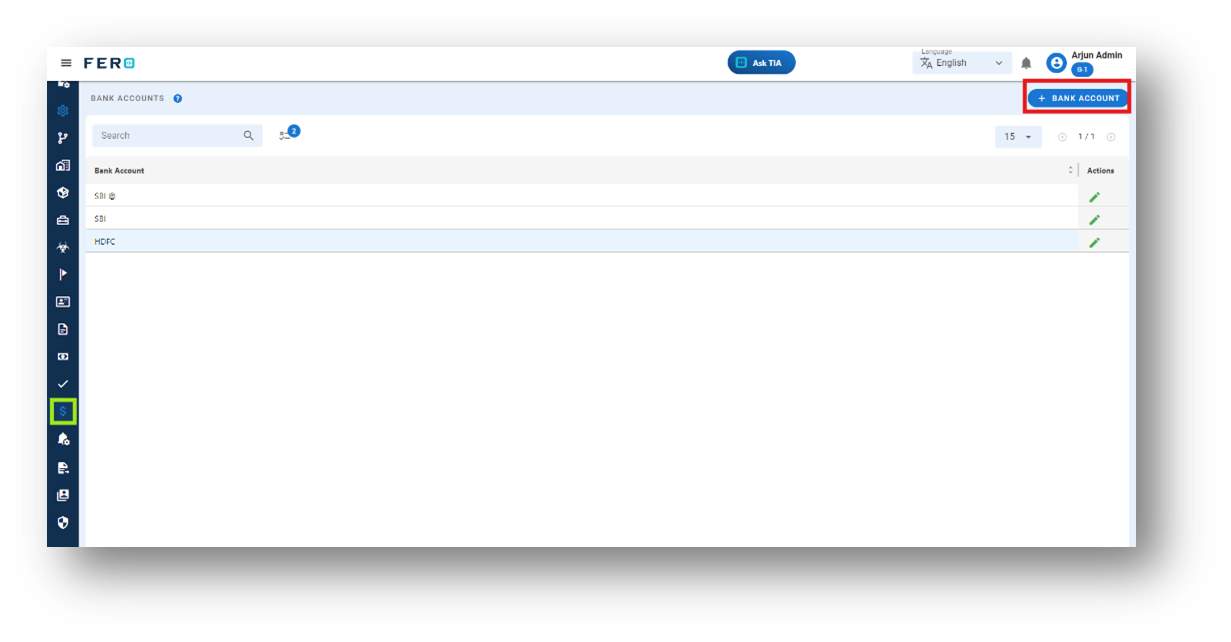
How to set up a Bank account?
Step 1: Navigate to the configuration section and click on it to reveal the drop-down list.
Step 2: Choose the Bank account option from the Configuration homepage.
Step 3: Select the "Add Charge codes" option to initiate the Charge codes creation process.
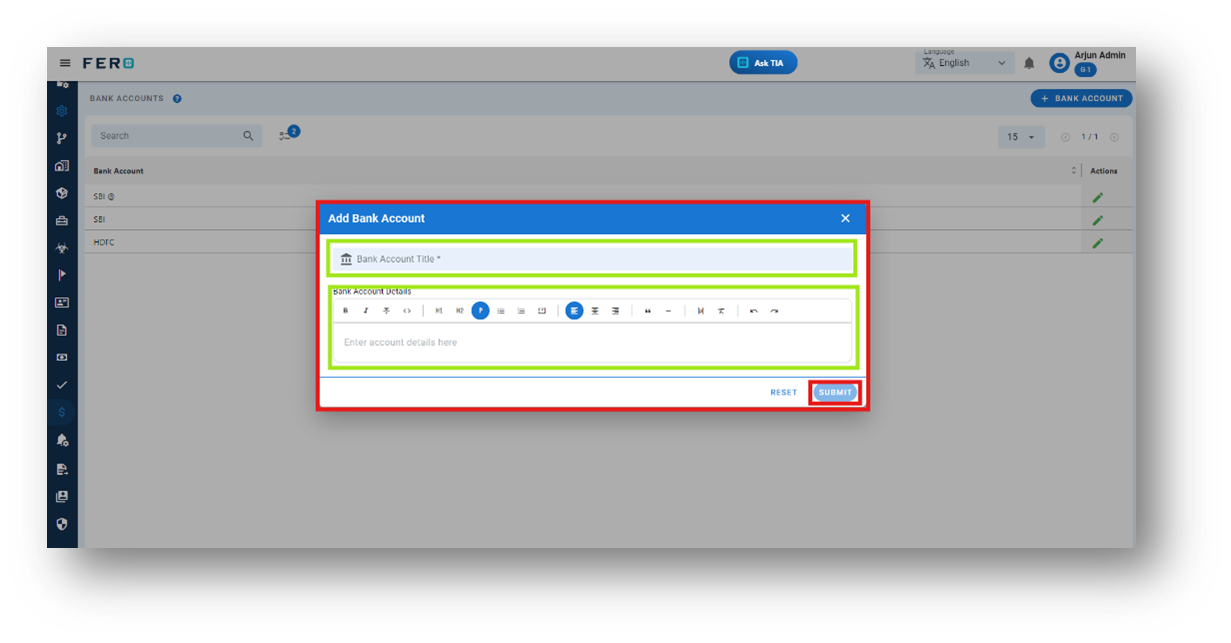
Step 4: Complete the following fields:
- Name the Bank Account Title
- Add All Information of Your Bank Account Details
After filling out these fields, click the "Submit" button. Your bank account will be added to the system, enabling you to receive money from your customers.
FAQs
Q1. Can I Edit the Bank Account information?
Yes, Bank Account details can be edited by navigating to the Bank Account homepage, where all Bank Account are listed. Locate the Bank Account you wish to modify and click on the edit icon. Changes will be updated in real-time.
Q2. Can I Add a Multiple Bank Account?
Absolutely, there are no limitations on the number of Bank Account. Depending on your business activities and operational requirements, multiple Bank Account can be seamlessly incorporated into your organization's structure.
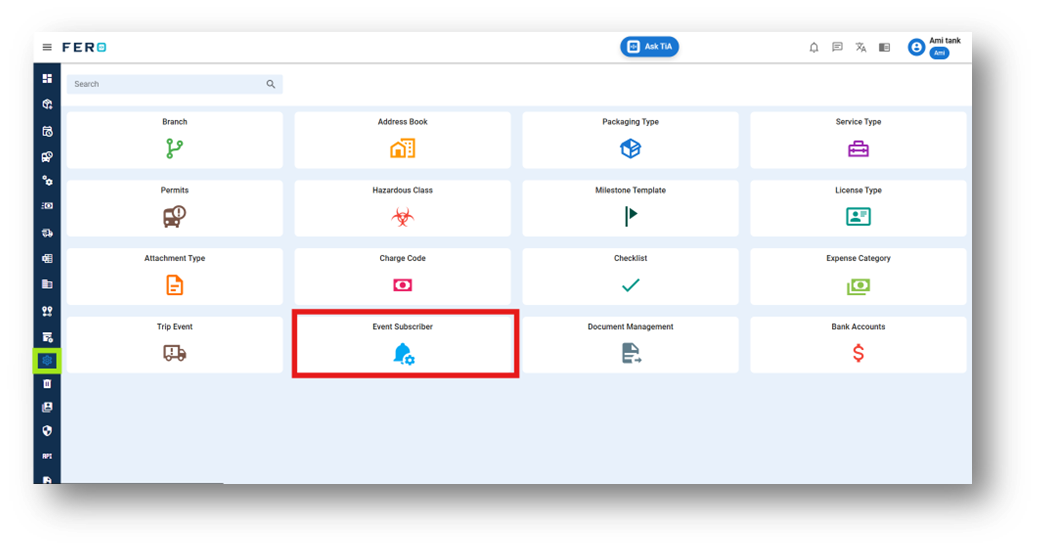
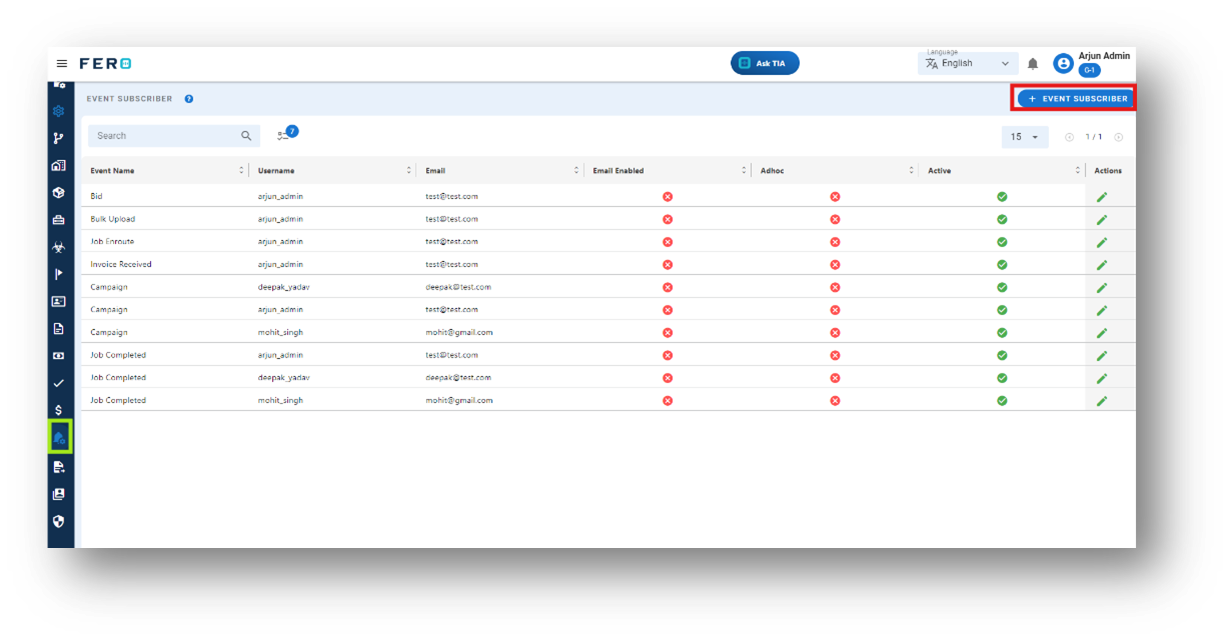
Event subscriber module of configuration
What is an Event subscriber?
Event subscribers receive notifications for subscribed events, enabling users to stay informed about relevant updates.
How to set up an Event subscriber?
Step 1: Navigate to the configuration section and click on it to reveal the drop-down list.

Step 2: Choose the Event subscribers option from the Configuration homepage.
Step 3: Select the "Add Event subscribers " option to initiate the Event subscriber’s creation process
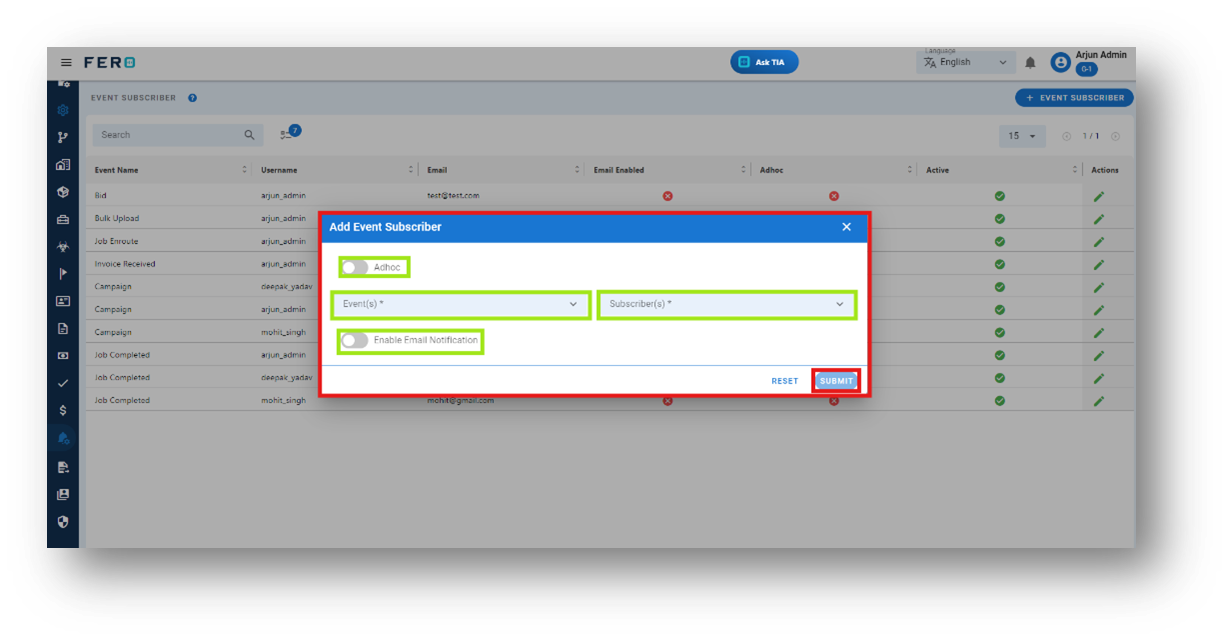
Step 4: Complete the following fields:
- Select Events from the dropdown list
- Select Subscribers from the dropdown list
- Use the Toggle Button to enable email notifications
- Adhoc Toggle Button: If the subscriber is not listed in the module, enable the Adhoc toggle. The page will change, allowing you to enter the subscriber's email address so they can receive event notifications.
After filling out these fields, click the "Submit" button. Your event subscribers will be added to the system, enabling them to receive notification
FAQs
Q1. Can I Edit the event subscriber information?
Yes, event subscriber details can be edited by navigating to the event subscriber homepage, where all event subscribers are listed. Locate the event subscriber you wish to modify and click on the edit icon. Changes will be updated in real-time.
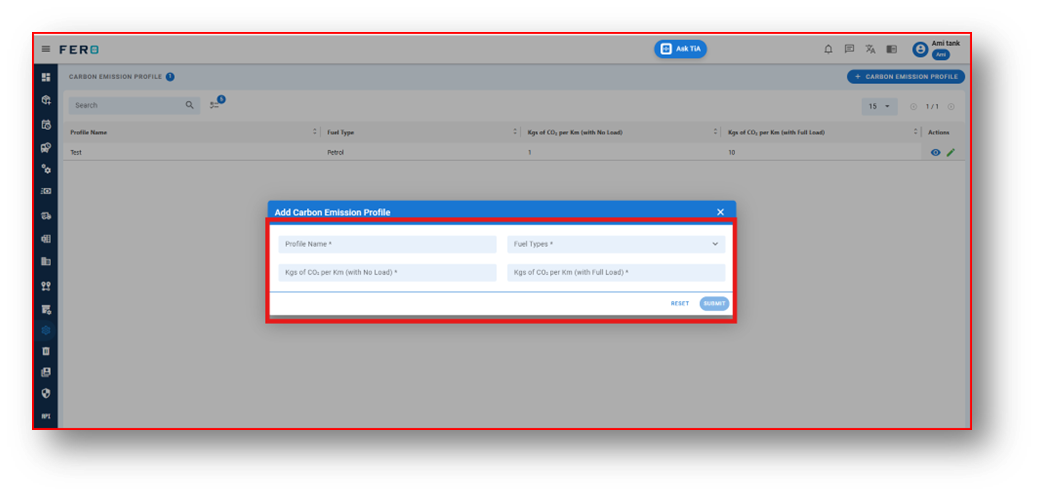
Carbon Emission Profile module of configuration
What is a Carbon emission profile?
carbon emission profile Manage CO2 emissions data, Add and organize carbon emission profiles by vehicle type Supports sustainability initiatives.
How to set up a carbon emission profile?
Step 1: Navigate to the configuration section and click on it to reveal the drop-down list.

Step 2: Choose the Carbon Emission option from the Configuration homepage.
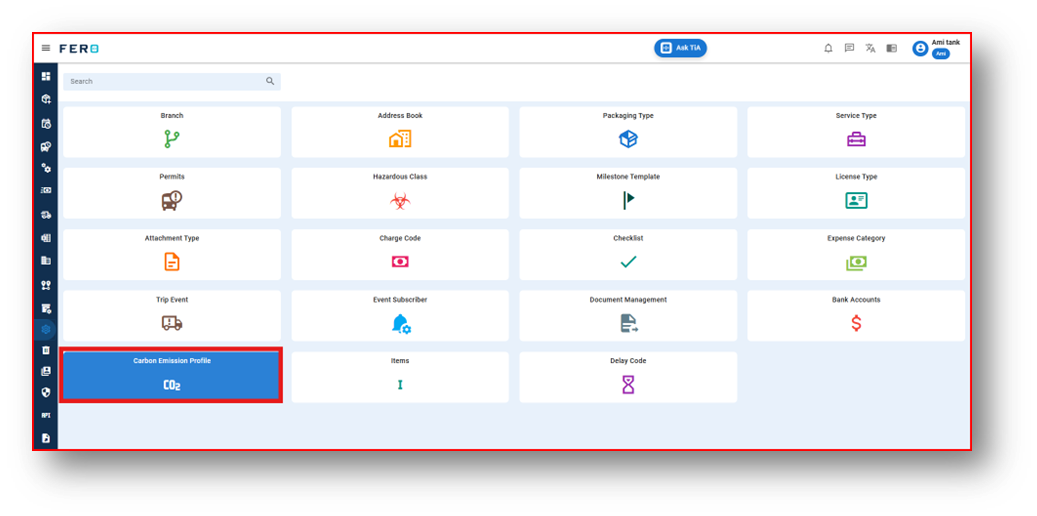
Step 3: Select the " Carbon Emission " option to initiate the Carbon Emission’s creation process.
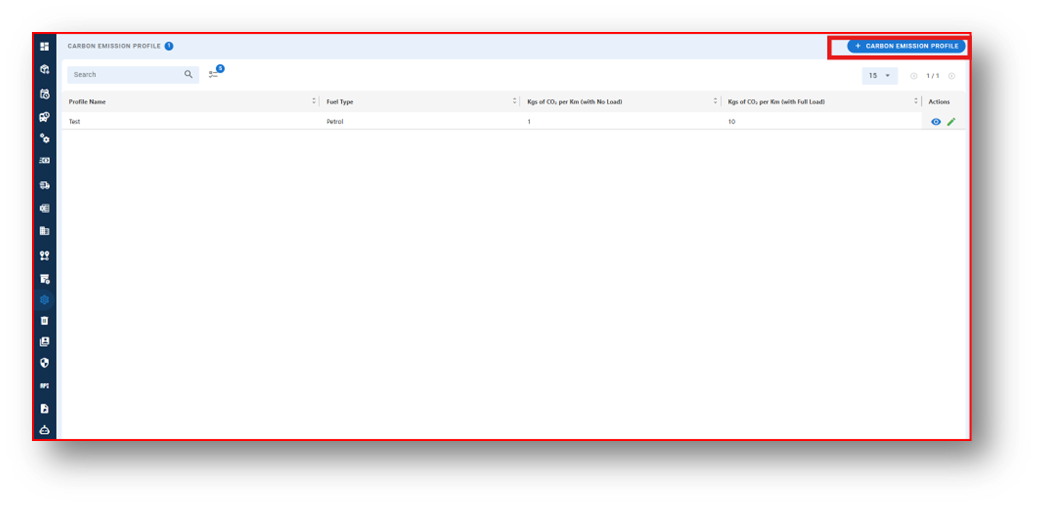
Step 4: Complete the following fields:
- Add Profile Name
- Select fuel type from the drop down
- Add Kgs of CO2 with no/without load
- Add Kgs of CO2 with Full load load
After filling out these fields, click the "Submit" button. Yor carbon emission will be added to the system, enabling you to receive carbon emission Reports and record.
FAQs
Q1. Can I Edit the Carbon Emission information?
Yes, Carbon Emission details can be edited by navigating to the Carbon Emission homepage, where all Carbon Emission are listed. Locate the Carbon Emission you wish to modify and click on the edit icon. Changes will be updated in real-time.
Q2. Can I Add a Carbon Emission Profile Account?
Absolutely, there are no limitations on the number of Carbon Emission Profile. Depending on your business activities and operational requirements, multiple Carbon Emission can be seamlessly incorporated into your organization's structure.
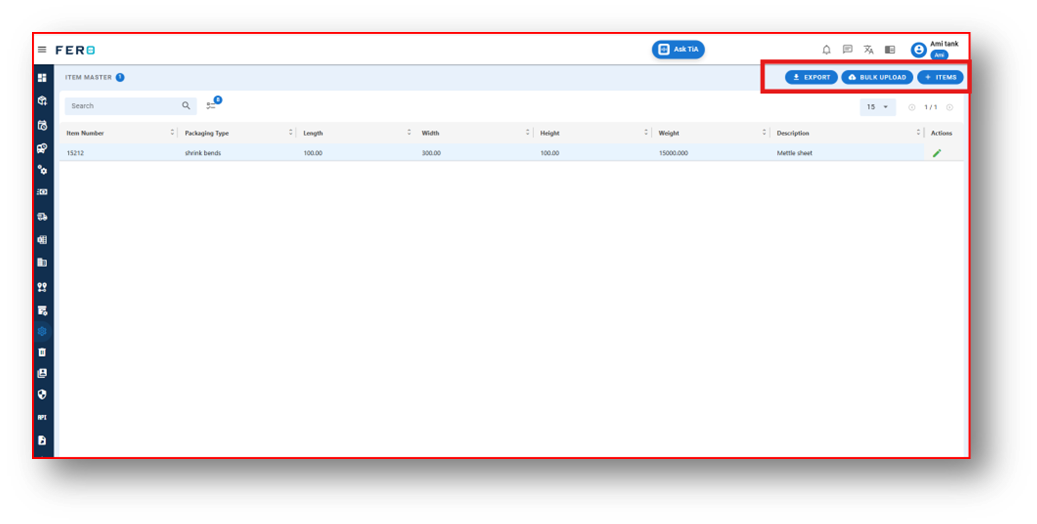
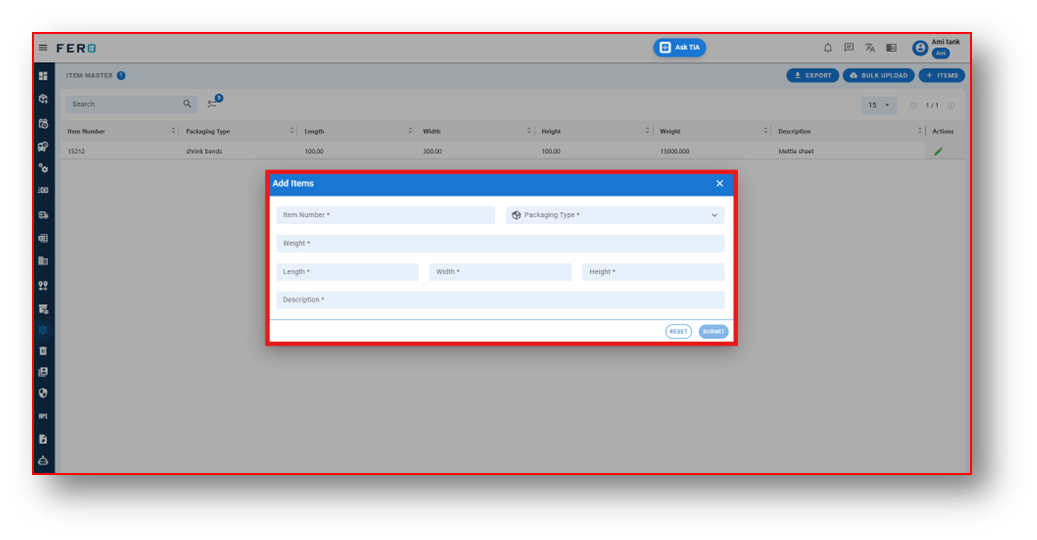
Item Master module of configuration
What is Item Master?
Add item details, including dimensions, weight, and packaging type, Simplifies inventory and shipment planning.
How to set up a Item master?
Step 1: Navigate to the configuration section and click on it to reveal the drop-down list.
Step 2: Choose the Item Master option from the Configuration homepage.

Step 3: Select the " Item master " option to initiate the Item master’s creation process.
Step 4: Complete the following fields:
- Add Item Number
- Select Packaging type from the drop down
- Add Weight of the Item
- Add LBH details
- Add Description
After filling out these fields, click the "Submit" button. Yor Item Master will be added to the system.
FAQs
Q1. Can I Edit the Item Master?
Yes, Item Master details can be edited by navigating to the Item Master homepage, where all item master are listed. Locate the Attachment Types you wish to modify and click on the edit icon. Changes will be updated in real-time.
Q2. Can I Add Multiple Item Master?
Absolutely, there are no limitations on the number of Item Master you can add for a module. Depending on your business activities and operational requirements, multiple Item Master can be seamlessly incorporated into your organization's structure.
Q3. Can I Bulk Upload the Item Master?
Yes, you can bulk upload Item Master. This method is the easiest and fastest way to add various Item Master. To do this, navigate to the bulk upload option, download the sample file, enter the details into the sample file, and upload the document. All the Item master will be added within seconds.
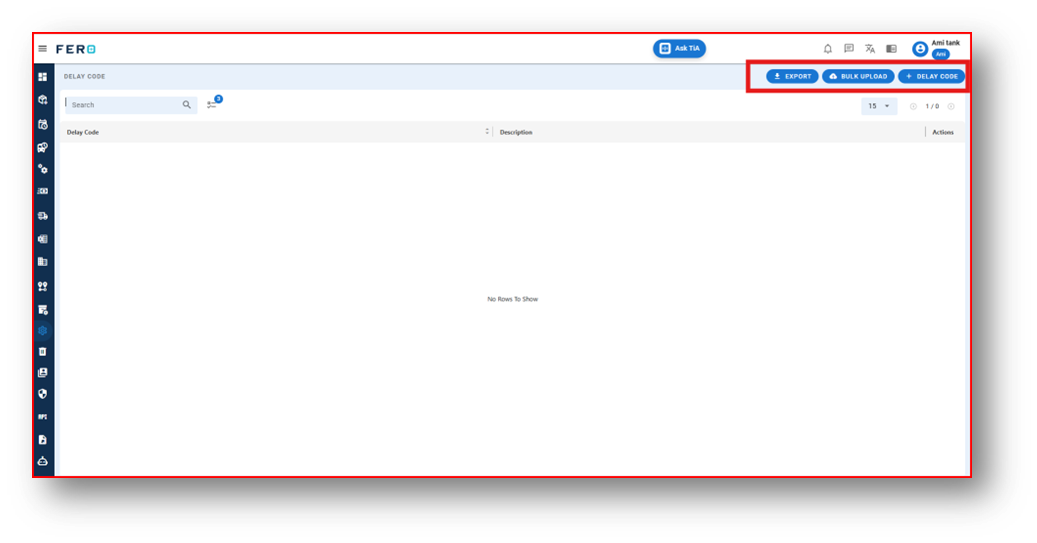
Delay Code module of configuration
What is Delay Code?
Add delay codes to improve operational timelines. Enhances operational efficiency.
How to set up a Delay Code?
Step 1: Navigate to the configuration section and click on it to reveal the drop-down list.
Step 2: Choose the Delay Code option from the Configuration homepage.
Step 3: Select the " Delay Code " option to initiate the Delay code’s creation process.
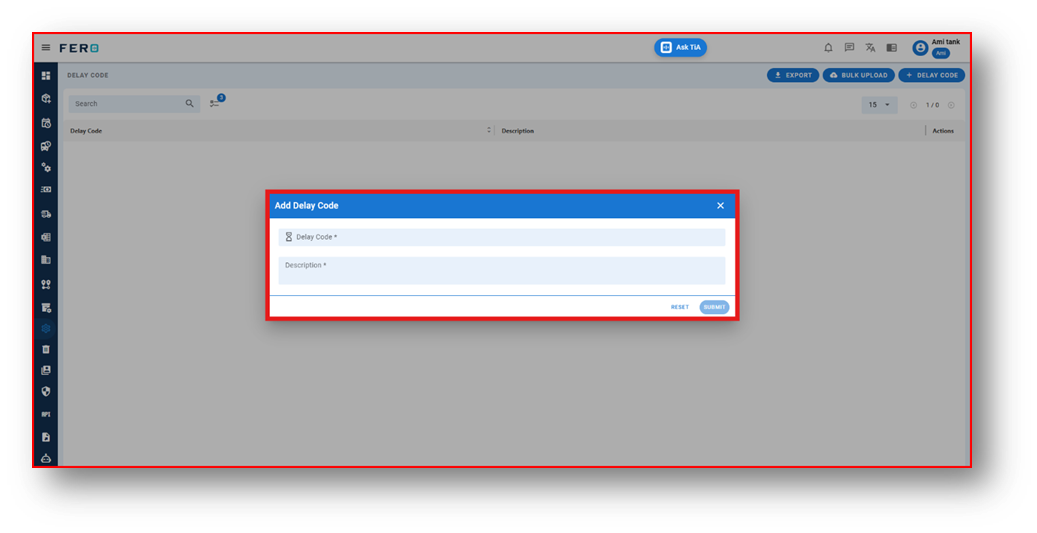
Step 4: Complete the following fields:
- Add Delay Code
- Add Delay Code Description
After filling out these fields, click the "Submit" button. Yor Delay Code will be added to the system.
FAQs
Q1. Can I Edit the Delay Code?
Yes, Delay code details can be edited by navigating to the Item Master homepage, where all item master are listed. Locate the Attachment Types you wish to modify and click on the edit icon. Changes will be updated in real-time.
Q2. Can I Bulk Upload the Delay Code?
Yes, you can bulk upload Delay Codes. This method is the easiest and fastest way to add various Delay Codes. To do this, navigate to the bulk upload option, download the sample file, enter the details into the sample file, and upload the document. All the Delay Code will be added within seconds.
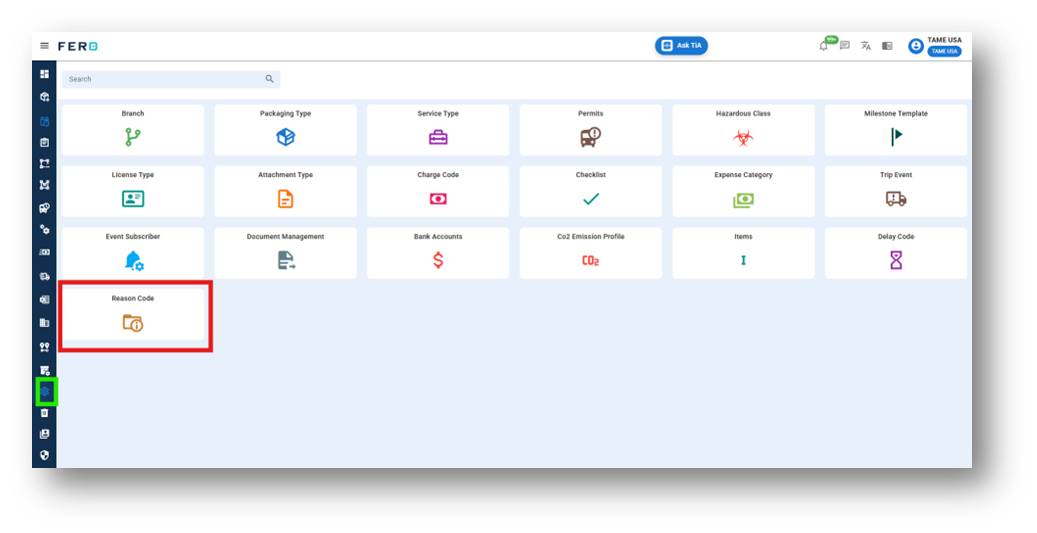
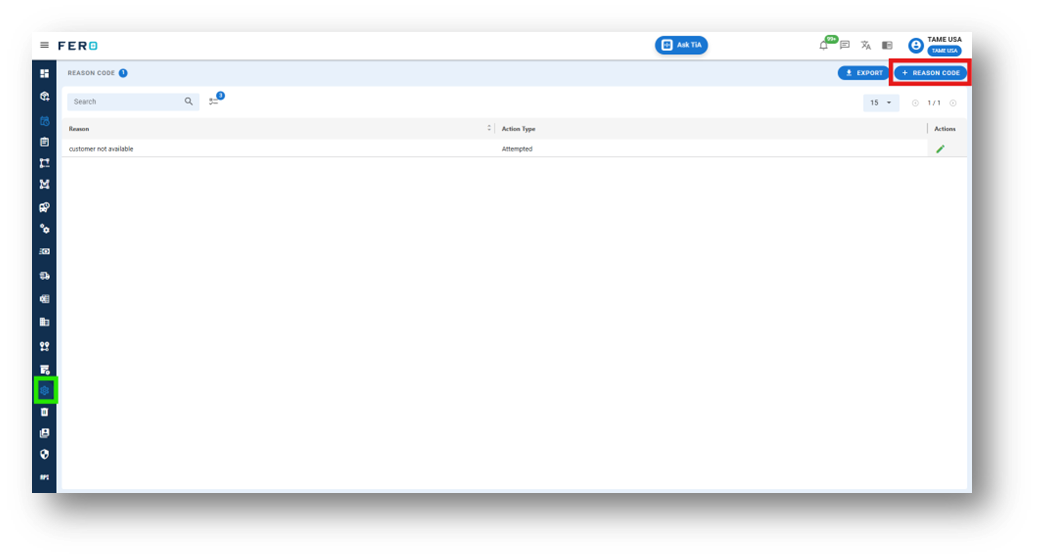
Reason Code module of configuration
What is Reason Code?
The Reason Code module facilitates the systematic definition and classification of various delivery outcomes, including Attempted, Partial Completion, Delivered, and Delivery Canceled. This module enables structured categorization.
How to set up a Reason Code?
Step 1: Navigate to the configuration section and click on it to reveal the drop-down list.
Step 2: Choose the Reason Code option from the Configuration homepage.
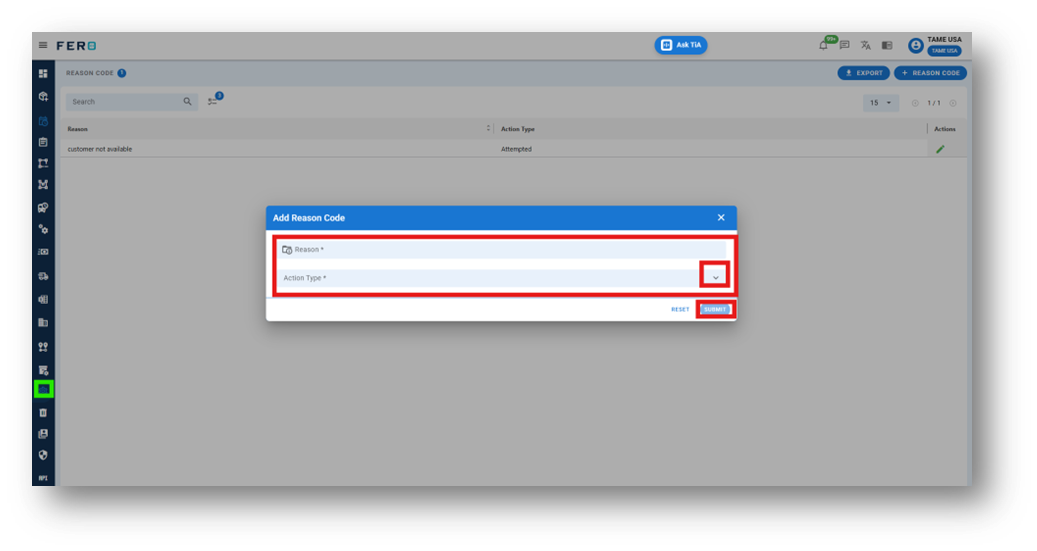
Step 3: Select the " Add Reason Code " option to initiate the reason code’s creation process.
Step 4: Complete the following fields:
- Add Reason Code
- Select Reason type from the drop down
After filling out these fields, click the "Submit" button. Your Reason Code will be added to the system.
Summary report module of configuration
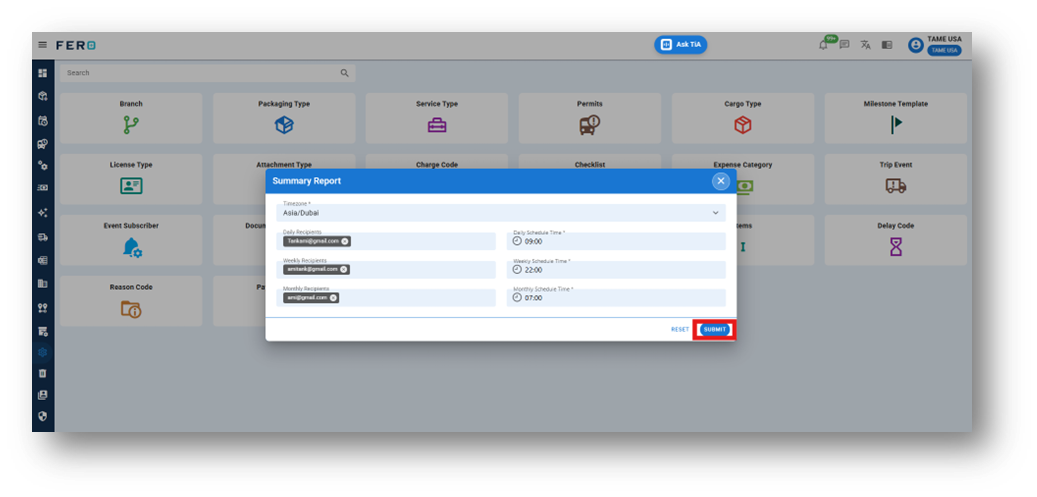
What is summary report?
- Time Zone: select appropriate time zone (e.g. Asia/Dubai).
- Report Frequency: Daily / Weekly / Monthly – choose one based on preference.
- Recipient Email Address: Enter preferred email address for report delivery.
How to set up a summary report?
Step 1: Navigate to the configuration section and click on it to reveal the drop-down list.
Step 2: Choose the summary report option from the Configuration homepage.
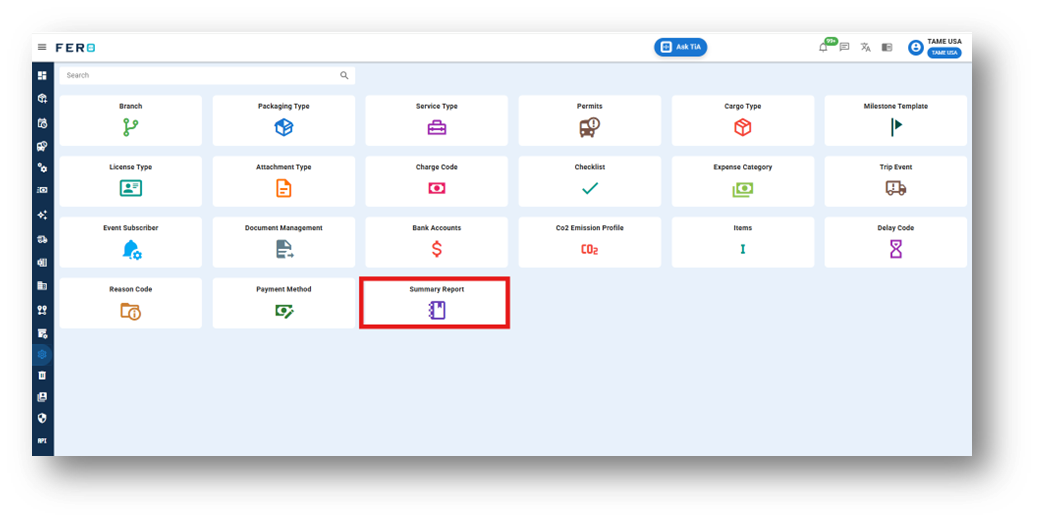
Step 3: click on the the "summary report" option to initiate the process.
Complete the following fields:
- Time Zone: Select the appropriate time zone from the drop down menu(e.g. Asia/Dubai).
- Report Frequency: Choose the desired frequency for report generation (Daily, Weekly, or Monthly).
- Recipient Email Address: Enter the email address where the summary reports should be delivered.
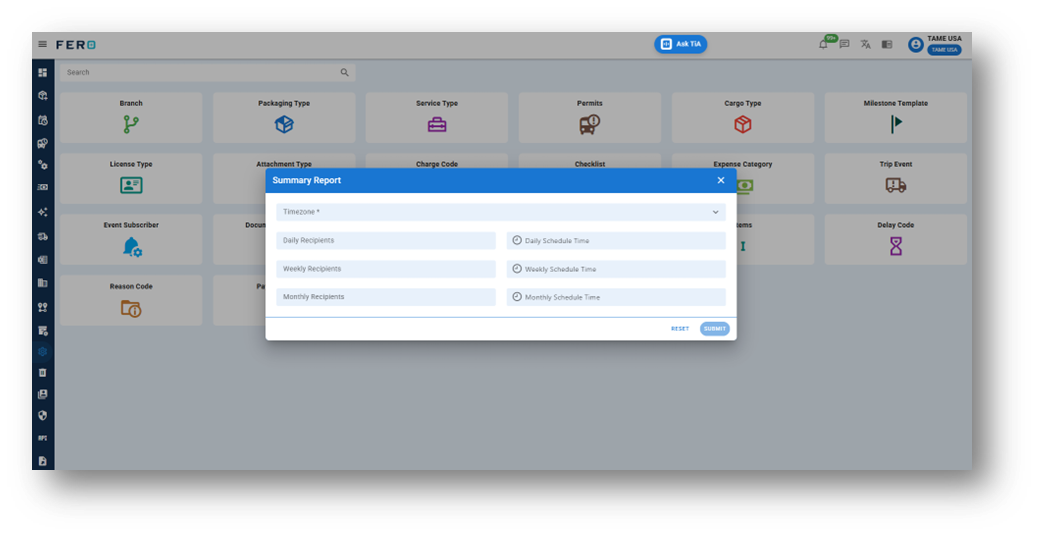
Step 4: click on the submit button.